Tutorial: splash screen
This small tutorial shows how to create splash screen (or loading form) with Nitisa extension for Visual Studio. It will take no more then 30 minutes to finish the tutorial.
Introduction
This tutorial shows how to work with Nitisa installed as Visual Studio extension. If you wish to follow it using Nitisa downloaded as source code, you may find useful information about creating project and forms in this tutorial. All other remains the same and you may follow steps of this tutorial.
If you haven't installed Nitisa extension for Visual Studio yet, please follow Installation paragraph of this tutorial or see how to install extension in the Installation guide.
When your application is big and complex it may loads for several seconds, or even minutes, and you might want to add splash screen to inform user about application starting progress. Lets see how it can be done with Nitisa.
Create project
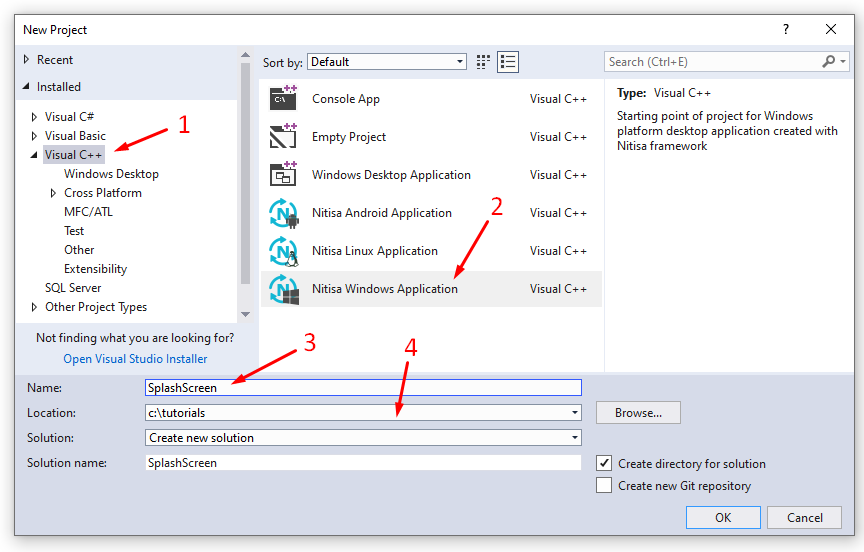
Start as usual with creating a project via Visual Studio File->New->Project... menu. Open Visual C++ section (1) in the appeared project creation window, select Nitisa Windows Application (2), specify name of the project (3) and where to save it (4).
After you click OK button a new project with a new form, called FormMain, will be created. We will use this form later as the main form of the application.
Splash form
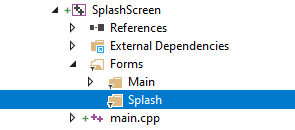
For the splash screen we need to create another form. As you may see in the created project structure there is a folder called Forms where all forms are supposed to be. Lets add a new form there. At first add new filter called Splash as shown below.
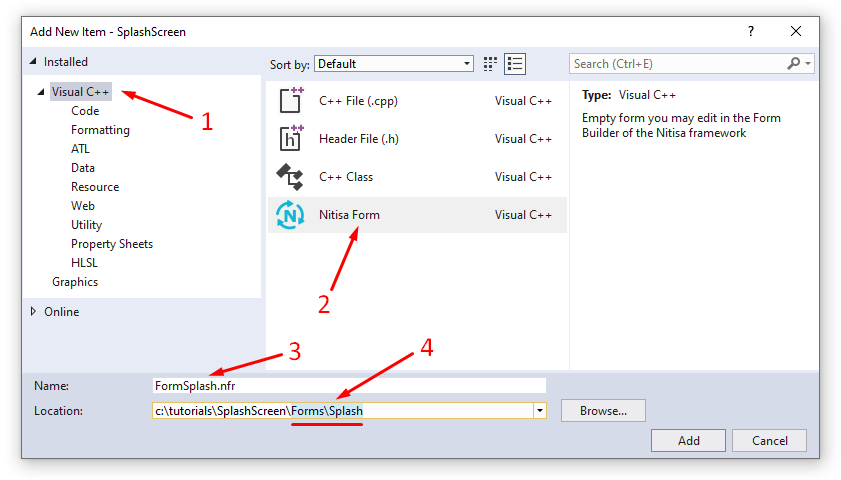
Next, click right mouse button on that filter, select Add->New Item... option and in the shown Add New Item window select Visual C++ option (1), Nitisa Form in the list (2), type name for the form as FormSplash (3) and add Forms\Splash folders to the path where the form should be saved (4).
By default the form in running application will look like regular form. It will have caption and borders, its size can be changed. Splash screen usually looks a little bit different. They don't have caption and cannot be resized and closed. So lets change the form properties to make it look and work like true splash screen. Change following properties in the property editor.
- Change Name property to FormSplash.
- Change HasCaption property to false.
- Change HasClientEdge property to false.
- Change HasMaximizeBox property to false.
- Change HasMinimizeBox property to false.
- Change HasSizeBox property to false.
- Change HasSystemMenu property to false.
- Change HasWindowEdge property to false.
- Change IsPopup property to true.
- Change WindowPosition property to ScreenCenter.
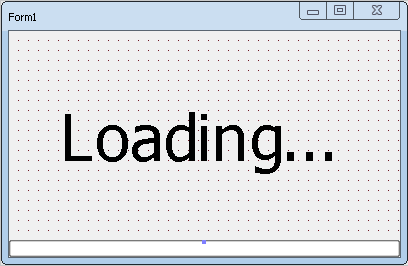
By these steps we gave a name to the form and removed caption and border. Lets create some basic layout for the form. Let it shows "Loading..." in the middle and progress bar at the bottom. To do so make the following.
- Add ProgressBar widget to the form.
- Change its Name property to ProgressBar.
- Change its Align property to Bottom.
- Add Label widget to the form.
- Change its Align property to Client.
- Change its CaptionHorizontalAlign property to Center.
- Change its Caption property to Loading....
- Change its Font property so its size is 48.
- Make the form size about a half from original one.
- Save the form.
After these steps the form will looks like on the picture below.
Clicking by Close button of the form is not the only way to close it. Thus hiding Close and other buttons together with the form caption is not enough to prevent its closing by user. To fix this we have to implement OnClose event of the form. In this event we can tell that closing is not needed independently on how user is trying to close it. To add the event, you need to access form's events, but to do so you need first to click on the form to deselect any selected widgets which is impossible because the widgets fill entire form's area. Here is a little trick how to achieve what we want. Click on any widget on the form. This will select only the widget you clicked on. Hold Shift button and click on that widget again. This will deselect the widget and thus form's events and properties will be shown in the Properties & Events area. Go to Events tab, find OnClose event and double click on the right of the event name to generate event method name. Save the form again.
You can close the form. We have finished with its layout and will add its implementation code now.
Create a new header file called FormSplash.h in the Forms\Splash folder of the project and put there following form declaration code.
#pragma once

#include "IFormSplash.h"

namespace nitisa
{
	namespace app
	{
		class CFormSplash :public IFormSplash
		{
		protected:
			void FormSplash_OnClose(IForm *sender, CloseAction &action) override;
		public:
			CFormSplash();

			void setProgress(const float progress);
		};

		extern CFormSplash *FormSplash;
	}
}
At first we included IFormSplash.h file with form prototype created by Form Builder for us when we saved the form. Then we declared our form class CFormSplash derived from the form prototype class IFormSplash. As you might remember Form Builder generates form prototype in the namespace nitisa::app by default. That is why we also put our form class in that namespace. In the protected section of the class we added event method declaration which is just a copy from the corresponding section of the IFormSplash class just marked as override and without virtual keyword. That is the standard way for events. In the public section we added declaration of the constructor and the method to set progress on the progress bar we added to the form. And finally we declared FormSplash variable which will contain instance of the splash form when it is created.
After declaring a form we need to implement its methods. Create source file called FormSplash.cpp in the same folder and put there following code.
#include "Platform/Core/Renderer.h"
#include "Platform/Core/Window.h"

#include "FormSplash.h"

namespace nitisa
{
	namespace app
	{
		CFormSplash *FormSplash{ nullptr };

		CFormSplash::CFormSplash() :
			IFormSplash(CWindow::Create(), CRenderer::Create())
		{

		}

		void CFormSplash::FormSplash_OnClose(IForm *sender, CloseAction &action)
		{
			action = CloseAction::None;
		}

		void CFormSplash::setProgress(const float progress)
		{
			m_pProgressBar->setProgress(progress);
		}
	}
}
At the beginning we include header files where CWindow and CRenderer helper classes for creating window and renderer are. After that we include header file with the form declaration. Inside the nitisa::app namespace we declare and initialize FormSplash variable and implement form's constructor, close event method and method for updating progress bar progress value.
All the method are extremely easy. Constructor just calls parent class constructor supplying it with created window and renderer. Event method just assign required action to the action parameter, which is None which means nothing will happen if user tries to close the form. And finally the setProgress() method just set specified progress value into progress bar widget.
We have finished splash form for our application. Lets now move to the main form.
Main form
You might recall that we left automatically created form, called FormMain untouched and said it will be the main form for the application. We won't create any layout for that form as we need only to show how to create splash screens for your application in this tutorial. We only make the main form hidden by default. In property editor change its State property to Hidden, save the form and close it.
Our application doesn't do anything hard at starting so we are going to simulate it. Open FormMain.cpp file. At the beginning of it add include of the splash form header file as we need to access its method to set progress of progress bar on it. Also add include of Windows.h file where the function Sleep() is. After this add following code into main form constructor.
for (int i = 1; i < 100; i++)
{
    FormSplash->setProgress((float)i);
    Application->ProcessMessages();
    Sleep(50);
}
Here we only simulate some time consuming job by running loop and changing progress value in it. Here we need to call application's ProcessMessages() method to allow other forms to do something. In our case it allows splash form to repaint itself. Additionally we call windows Sleep() function to wait for 50 milliseconds before next loop iteration. Below is the complete code of the FormMain.cpp file (we removed all comments generated by default).
#include "Platform/Core/Window.h"
#include "Platform/Core/Renderer.h"

#include "FormMain.h"
#include "../Splash/FormSplash.h"

#include <Windows.h>

namespace nitisa
{
	namespace app
	{
		CFormMain *FormMain{ nullptr };

		CFormMain::CFormMain() :
			IFormMain(CWindow::Create(), CRenderer::Create())
		{
			for (int i = 1; i < 100; i++)
			{
				FormSplash->setProgress((float)i);
				Application->ProcessMessages();
				Sleep(50);
			}
		}
	}
}
Application
The only thing left to change is main.cpp file. As you might see it also was generated for you when you created the project. We need to add creation of the splash form in it as well as proper form showing. So, add include of the splash form header file right before include of the main form header file. Then add splash form creation right before creation of the main form. After creation of main form and telling application manager it is the main form, right before running application, add splash form releasing and main form showing. The final code you can see below.
#include "Platform/Core/Application.h"

#include "Forms/Splash/FormSplash.h"
#include "Forms/Main/FormMain.h"

#include <Windows.h>

#pragma comment(lib, "Nitisa.lib")
#pragma comment(lib, "Standard.lib")
#pragma comment(lib, "Platform.lib")
#pragma comment(lib, "Extended.lib")
#pragma comment(lib, "OpenGL.lib")
#pragma comment(lib, "Charts.lib")
#pragma comment(lib, "Ide.lib")
#pragma comment(lib, "opengl32.lib")

int WINAPI WinMain(HINSTANCE, HINSTANCE, PSTR, INT)
{
	nitisa::CApplication app;
	app.CreateForm(&nitisa::app::FormSplash);
	app.CreateForm(&nitisa::app::FormMain);
	app.setMainForm(nitisa::app::FormMain);
	nitisa::app::FormSplash->Release();
	nitisa::app::FormMain->Show();
	app.Run();
	return 0;
}
If you build and run application you will see that splash form appears, shows increasing progress in about 5 seconds, then disappears and main form appears.

Conclusion
As you can see the process of creating of a splash screen is quite trivial. You just need to create a form without caption and buttons and usually without borders, make layout for it in the form builder and show it before long lasting loading starts and release the form after initialization part of the application is finished. Instead of text Loading... you may use image or application logo. You also may show additionally (or instead) to progress bar some texts indicating what is currently being loaded and so on.
You can find project SplashScreen in the latest release of the Nitisa framework in Tutorials\SplashScreen folder of the Nitisa solution. To build it you have to select Debug configuration and x86 platform.