Tutorial: "Todo list" application
From this article you will learn how to add graphical user interface(form with inputs, buttons, and another widgets), easily and quickly to your C++ application. This all could be achieved without using MFC, .NET, WPF and other platform dependent Microsoft frameworks. This article is a tutorial for ones who begin working with the Nitisa framework. It covers such a topics as preparing for work with the framework and creation forms with GUI using visual Form Builder included into the framework.
Introduction
Installation
Create project
Create form
Create events
Implement form logic
Create application
Improvements
Introduction
This tutorial shows how to work with Nitisa framework installed as Visual Studio extension. If you don't want to install the extension you may download the framework source code and use it alone as described in the next tutorial. Anyway, even in such a case you may read this tutorial and decide later if you want to install extension or use source code only. If you want to learn more about differences, you may look at the installation article.
Installation
First of all we need Visual Studio(of course with enabled/installed ability for developing classical C++ applications). Visual Studio Community is okay as well. This tutorial was written using Visual Studio 2017 but everything written here could easily be used in another versions of Visual Studio(except for the oldest ones).
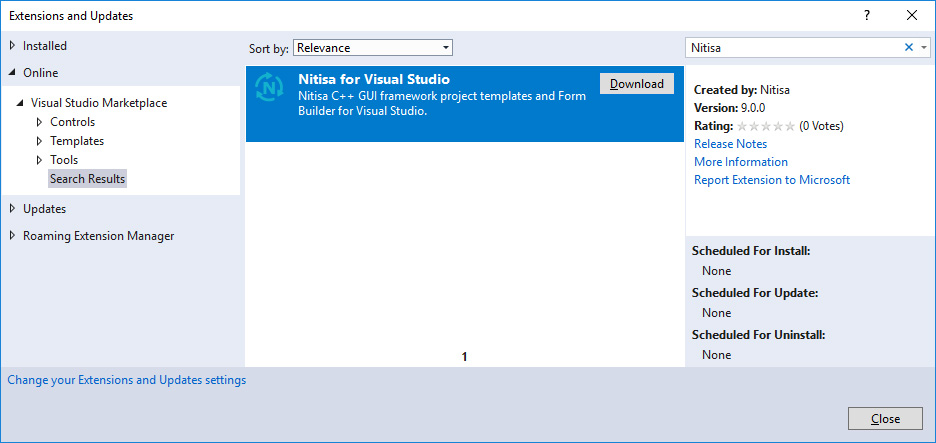
After Visual Studio installation lets install Nitisa extension for Visual Studio. Run Visual Studio, go to Tools->Extensions and Updates menu, click on the Online in the list at the left part of Extensions and Updates window, type Nitisa in the search box at the top right part of the window, find Nitisa for Visual Studio extension in the list in the middle and click on Download button to install the extension as shown below.
After installation is finished the Nitisa framework is ready to use. There is no need in building or any other actions as in standalone installation. All you need is to install the extension. That simple.
Create project
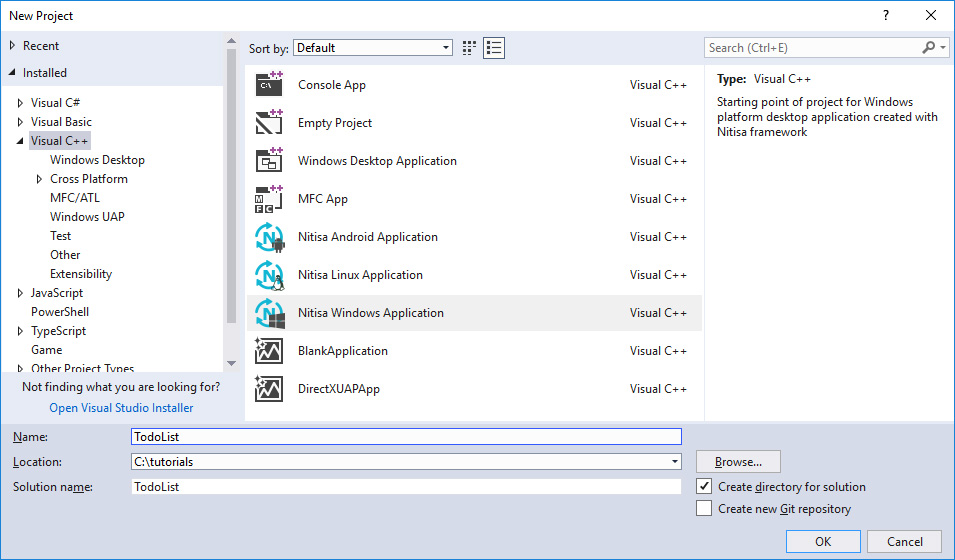
In this tutorial we will create a simple application "Todo list". Lets open Visual Studio and create Nitisa Windows Application like shown below.
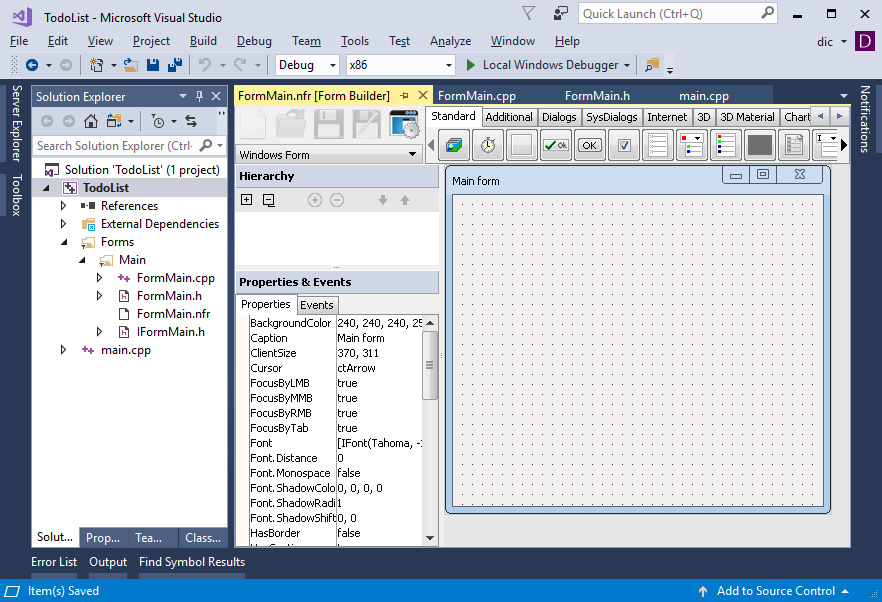
Generated project has an empty Nitisa form and main.cpp file with code for initialize and running an application and is opened after generation as you can see on the next image.
Create form
All forms in the framework are placed inside Forms folder(s) and each one is placed inside separate subfolder there. Nitisa project templates follow that convention. Although we recommend to use it in your projects it is not mandatory. Lets see how to add new form in another place of your project.
First of all remove the form created for your. Close FormMain.* files in Visual Studio. Select Forms folder in Solution Explorer and press Delete button on keyboard and accept deleting when Visual Studio asks you if you really want to delete the folder. At this action Visual Studio only deletes folder from project but it remains on hard drive so go to the project folder and delete Forms folder there as well.
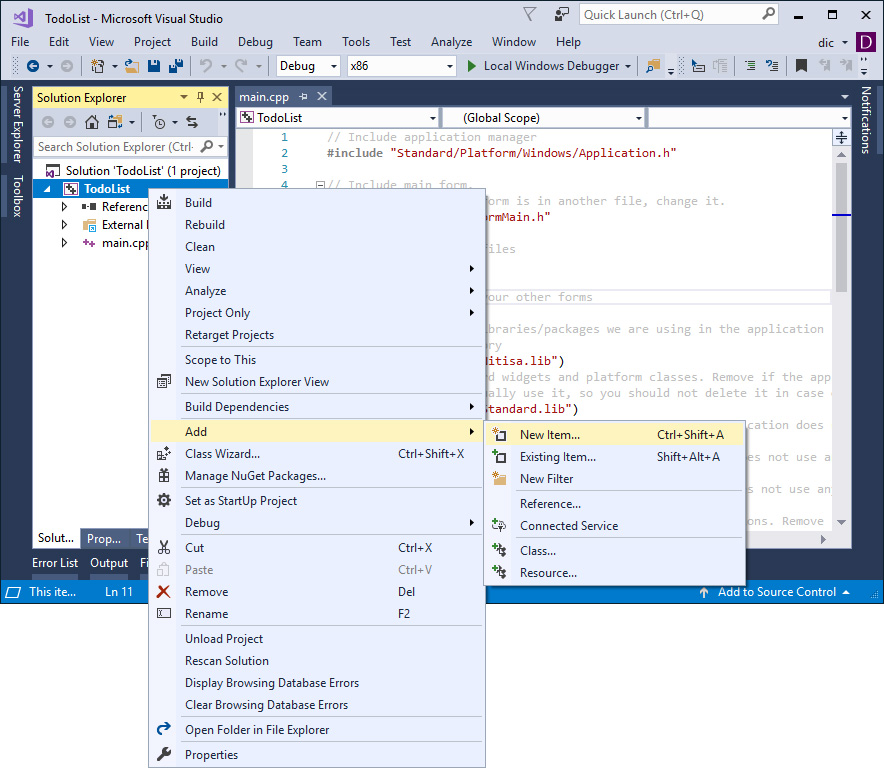
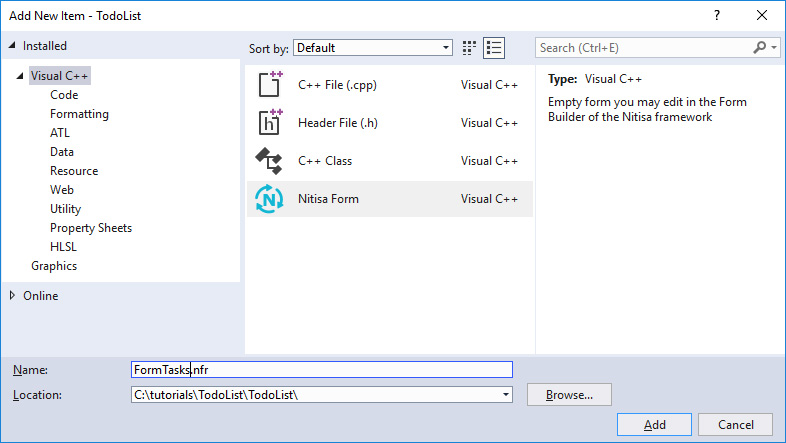
Lets now add new empty form to the project root. Right click on the project name, go to Add item in the popup menu and click on New Item... subitem as shown below.
In the appeared Add New Item window select Nitisa Form and type FormTasks.nfr name for it. Then click on Add button to finish adding new form.
Form file will be added to the project and opened in the Form Builder right inside Visual Studio.

The Form Builder window is split into several parts: at the left top part there are control buttons for creation, opening, and saving forms as well as button for accessing configuration. At the left of the control buttons there is a list of available widgets. Below at the left located, from top to bottom, hierarchy editor(it is a hierarchical representation of a form) and editors of properties and events(you may switch between them by clicking on corresponding tabs). All the remaining part is the form editor. To add a widget onto a form you need to click on required one in the list at the top and click on the form in form editor in the place where you want new widget to appear. Widgets on a form could be moved, resized and rotated. By default all such an actions are constrained to a grid which you may configure or disable at all in the Form Builder configuration window. You can use keyboard arrows to move widgets free even if grid is enabled. If you hold Shift key during this then the size will be changed instead of moving. You also can hold the Ctrl key to move and resize widgets with respect to grid settings. When you select a widget on a form its properties and events appear in corresponding editors at the left. You can change them there. If several widgets are selected(you can do such a selection by clicking on widgets with holding Shift key) then only common properties and events are shown and available for editing. Changing event or property in this case will be applied to all the selected widgets. If no widget is selected then the form own properties and events will appear in the editors.
Note: buttons for creating a new form, opening and saving a form are disabled in integrated version of the Form Builder. You have to use standard Visual Studio buttons and menus for this features. You have already seen how we created a new form using standard Visual Studio's way.
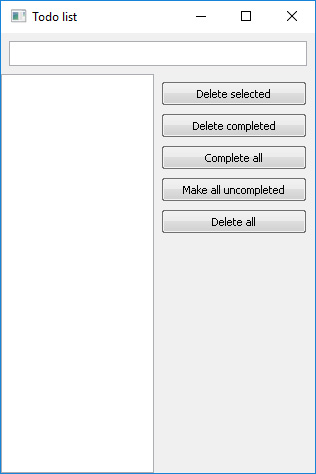
Using just now received knowledge lets create a simple layout for our "Todo list" application as shown on the image below.
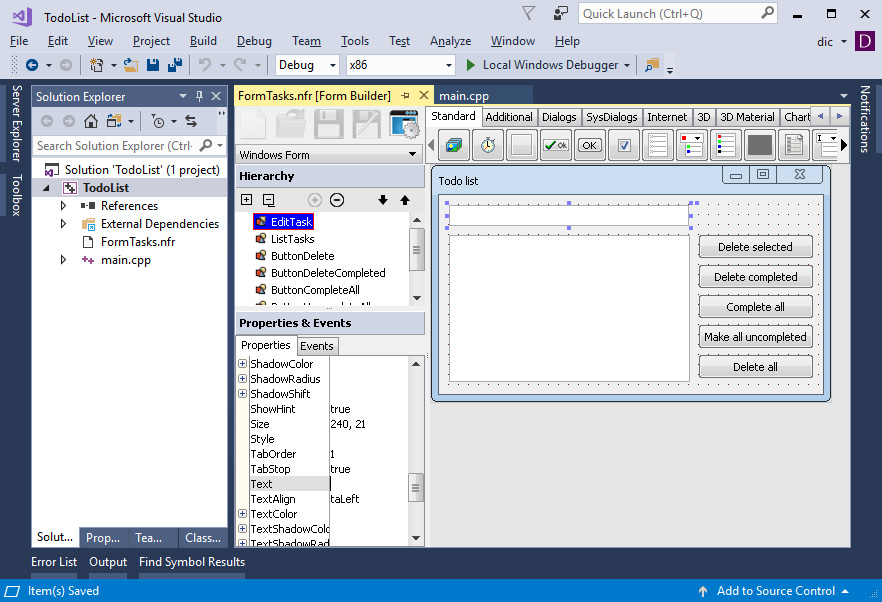
Lets use the following names(property Name) for the widgets and the form.
EditTask - input for entering a task name(Edit widget)
ListTasks - task list(CheckListBox widget)
ButtonDelete - button for deleting selected tasks(Button widget)
ButtonDeleteCompleted - button for deleting completed(checked) tasks(Button widget)
ButtonCompleteAll - button for setting completeness state for all tasks(Button widget)
ButtonUncompleteAll - button for removing completeness state from all tasks(Button widget)
ButtonClear - button for clearing tasks list(Button widget)
FormTasks - form's name
Form size can be changed by dragging its right and bottom borders or right-bottom corner. Save the form(just press Ctrl+S or use any other way Visual Studio provides). When you are saving a form in the Form Builder it also automatically generates a C++ file with the code with similar name. The only difference is the I at the beginning and *.h extension. So in this example the name of the file will be IFormTasks.h. This file contains form initialization code. We will use it later in our project.
Do not forget to set property Multiselect value to true for task list widget so we could select several tasks simultaneously.
Create events
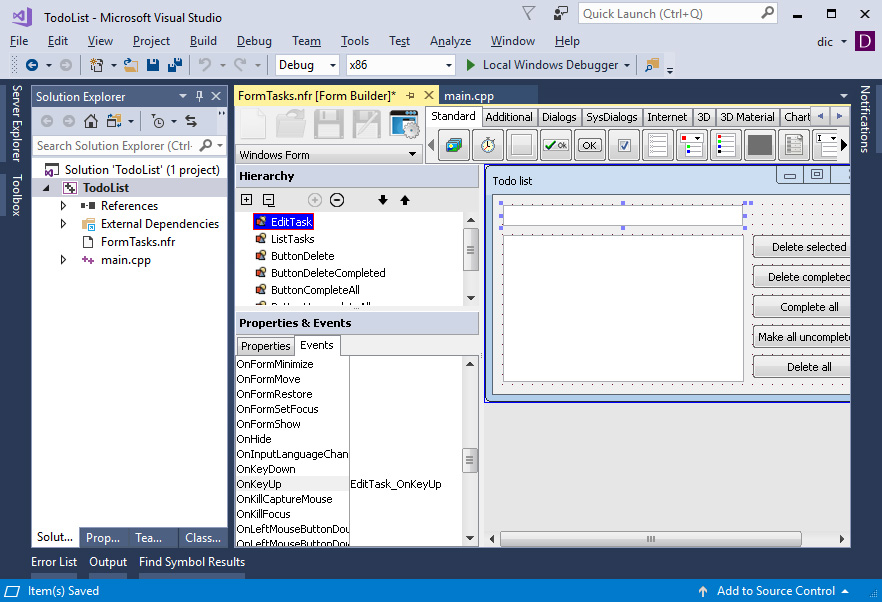
Now, when you have the form, lets add events which we will later process in application and perform some actions in them. At first, as you might have already noticed, we have no task adding button on the form. We will add one when user press return/enter key on keyboard after typing task name. Select input field EditTask by clicking left mouse button on it and go to the events tab at the left of the form editor in the part called Properties & Events. As you can see all the event values are empty. Double click at the right of the event called OnKeyUp. The value for the event will be automatically set to EditTask_OnKeyUp. You can change this value if you want another name for the event. The event name is the method name in the form which will be called automatically when corresponding event happens.
In the same way generate events for all buttons on the form. In this case the required event is called OnClick. It is triggered when user clicks on button or press return/enter key when the button is focused. You may also assign the same event value for compatible events to process them by the same method. It may be useful when same events from different widgets could be processed by a single method. In our application we need unique event processing methods because different buttons do different jobs. To remove event processing method generation from the code generated for the form you just need to edit event value and set it to empty in event editor.
After adding events save the form again.
Implement form logic
We have finished with layout of our application and moving to programming logical part.
Create a header file for our form in the root of the project and call it FormTasks.h. Put following code inside it.
#pragma once

#include "IFormTasks.h"

namespace nitisa
{
    namespace app
    {
        class CFormTasks :public IFormTasks
        {
        protected:
            // You may just copy declaration of the following methods from the IFormTasks.h and edit it a little to have following final result.

            void EditTask_OnKeyUp(IControl *sender, const MessageKey &m, bool &processed) override;
            void ButtonDelete_OnClick(IControl *sender) override;
            void ButtonDeleteCompleted_OnClick(IControl *sender) override;
            void ButtonCompleteAll_OnClick(IControl *sender) override;
            void ButtonUncompleteAll_OnClick(IControl *sender) override;
            void ButtonClear_OnClick(IControl *sender) override;
        public:
            CFormTasks();
        };

        extern CFormTasks *FormTasks; // Declaration of the variable where the form instance will be stored
    }
}
At the beginning we include a file which was generated by the Form Builder when we saved our form. Lets further call it a form prototype. Shortly this file contains code for the form initialization and event method prototypes which are called when events we defined in the event editor will happen. We will derive our form from this prototype. In our form class we will add constructor and methods for event processing. By default the Form Builder generates form prototype in the nitisa::app namespace. It could be changed in the Form Builder settings. In our simple application we will use the default namespace and put our form in the same one for simplicity.
Lets now create file FormTasks.cpp and implement all required methods. The first one is constructor. In it you first of all should call the parent class constructor. In our example it is IFormTasks(). It has two parameters: window where the form will be displayed and renderer responsible for drawing. Implementations of both classes are available in the Platform Package included into the Nitisa framework. We just have to create two required objects and put them as form prototype constructor arguments.
#include "Platform/Core/Window.h" // Include file where the window class is implemented
#include "Platform/Core/Renderer.h" // Include file where the renderer class is implemented
#include "FormTasks.h"

namespace nitisa
{
    namespace app
    {
        CFormTasks::CFormTasks() :
            IFormTasks(CWindow::Create(), CRenderer::Create())
        {

        }

        // Another methods will be here later
    }
}
That is all. Constructor is ready. All the work required for setup the form is hidden in the IFormTasks constructor. Lets now implement methods for event processing. Lets start from the method responsible for adding a new task to the list. By the way all the widgets we have added to the form in the Form Builder are accessible in the code with the names m_pName where Name is the name of the widget you see in the Name property of the Form Builder and m_p is a prefix which you also can change in the Form Builder settings.
void CFormTasks::EditTask_OnKeyUp(IControl *sender, const MessageKey &m, bool &processed)
{
    if (m.Key == Key::Return)
    {
        String name{ Trim(m_pEditTask->getText()) };
        if (!name.empty())
            m_pListTasks->Add(name);
    }
}
Many events provide additional information, like in this case about the key which was released. We are going to add a new task only when return/enter key is pressed and released and, moreover, before adding a task we will check if the specified task name is not empty. It is very easy to do with the helper functions of the framework. You can find all the available functions and description of each of them in the Reference. In our example we take current value from the input field with help of getText() method of the Edit widget and add a new line to the list with help of the Add() method of the CheckListBox widget.
Lets now implement removing of selected tasks from the list which happens by clicking on ButtonDelete.
void CFormTasks::ButtonDelete_OnClick(IControl *sender)
{
    m_pListTasks->LockUpdate();
    for (int i = m_pListTasks->getItemCount() - 1; i >= 0; i--)
        if (m_pListTasks->getItem(i)->isSelected())
            m_pListTasks->Delete(i);
    m_pListTasks->UnlockUpdate();
}
When some change is happened to the widget, like removing an item from a list, it performs calculation of new state and draw itself automatically. Many widgets dealing with lists have methods LockUpdate() and UnlockUpdate(). This methods provides ability for temporary disabling recalculations and drawings. They could be useful when several actions are being performed and there is no sense in expensive calculations and drawing at each one and only one recalculation and drawing at the end is enough. We, in our example, will delete all selected tasks one by one. It could be only one task or many of them. To prevent unnecessary work performed by CheckListBox each time an item is being removed from it, we will enclose all the deletion into logical brackets LockUpdate...UnlockUpdate.
All remaining methods are really simple and there is no sense in describing each of them in details. The final code of the FormTasks.cpp is here.
#include "Platform/Core/Window.h" // Include file where the window class is implemented
#include "Platform/Core/Renderer.h" // Include file where the renderer class is implemented
#include "FormTasks.h"

namespace nitisa
{
    namespace app
    {
        CFormTasks *FormTasks{ nullptr }; // Variable where the form instance will be stored

        CFormTasks::CFormTasks() :
                IFormTasks(CWindow::Create(), CRenderer::Create())
        {

        }

        void CFormTasks::EditTask_OnKeyUp(IControl *sender, const MessageKey &m, bool &processed)
        {
            if (m.Key == Key::Return)
            {
                String name{ Trim(m_pEditTask->getText()) };
                if (!name.empty())
                    m_pListTasks->Add(name);
            }
        }

        void CFormTasks::ButtonDelete_OnClick(IControl *sender)
        {
            m_pListTasks->LockUpdate();
            for (int i = m_pListTasks->getItemCount() - 1; i >= 0; i--)
                if (m_pListTasks->getItem(i)->isSelected())
                    m_pListTasks->Delete(i);
            m_pListTasks->UnlockUpdate();
        }

        void CFormTasks::ButtonDeleteCompleted_OnClick(IControl *sender)
        {
            m_pListTasks->LockUpdate();
            for (int i = m_pListTasks->getItemCount() - 1; i >= 0; i--)
                if (m_pListTasks->isChecked(i))
                    m_pListTasks->Delete(i);
            m_pListTasks->UnlockUpdate();
        }

        void CFormTasks::ButtonCompleteAll_OnClick(IControl *sender)
        {
            m_pListTasks->LockUpdate();
            for (int i = m_pListTasks->getItemCount() - 1; i >= 0; i--)
                m_pListTasks->setChecked(i, true);
            m_pListTasks->UnlockUpdate();
        }

        void CFormTasks::ButtonUncompleteAll_OnClick(IControl *sender)
        {
            m_pListTasks->LockUpdate();
            for (int i = m_pListTasks->getItemCount() - 1; i >= 0; i--)
                m_pListTasks->setChecked(i, false);
            m_pListTasks->UnlockUpdate();
        }

        void CFormTasks::ButtonClear_OnClick(IControl *sender)
        {
            m_pListTasks->Clear();
        }
    }
}
Create application
Now we have completely finished form class for our application. The only remaining thing is to create the form when running the application. It is an extremely easy task. When you created the project the main.cpp file was generated automatically. It also has code for creating an automatically generated form. As you might remember it was in the folder Forms\Main and was called FormMain. As you might also recall we deleted it from the project and added a new one with another name instead but we didn't modify the main.cpp file. To adjust it to our changes you only need to change form inclusion and name. Here is the final version of the main.cpp file.
// Include application manager
#include "Platform/Core/Application.h"
// Include form.
#include "FormTasks.h"
// Include additional files
#include <Windows.h>
// Tell linker which libraries/packages we are using in the application
// Nitisa core. Mandatory
#pragma comment(lib, "Nitisa.lib")
// Package with standard widgets
// Required for Platform package
#pragma comment(lib, "Standard.lib")
// Package with platform-dependent classes(for Application, Window, Renderer, and others)
#pragma comment(lib, "Platform.lib")
// Package with extended set of widgets. Remove if the application does not use anything from it
#pragma comment(lib, "Extended.lib")
// Package with OpenGL widgets. Remove if the application does not use anything from it
#pragma comment(lib, "OpenGL.lib")
// Package with chart widgets. Remove if the application does not use anything from it
#pragma comment(lib, "Charts.lib")
// Package with widgets designed to be used in IDE applications. Remove if the application does not use anything from it
#pragma comment(lib, "Ide.lib")
// Link with OpenGL. Required for OpenGL renderers from Platform package.
#pragma comment(lib, "opengl32.lib")
int WINAPI WinMain(HINSTANCE, HINSTANCE, PSTR, INT)
{
// Create application.
nitisa::CApplication app;
// Create form.
app.CreateForm(&nitisa::app::FormTasks);
// Tell application manager which form is the main one.
app.setMainForm(nitisa::app::FormTasks);
// Run application.
app.Run();
return 0;
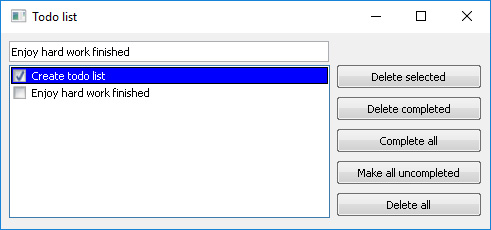
}Now you can build and run the application. First build may take some time as the Nitisa framework need to be built first. This happens only when you build first Nitisa application.
As you can see the creation of applications with graphical user interfaces is very easy. Moreover, the layout of widgets could be adjusted drastically just changing their properties and ending with amazing forms.
For one form application this code is okay. If your application is going to have two or more forms a few changes should be added: you will need variables for each of forms and add app.CreateForm() call for each of the forms(speaking frankly it is not necessary as you can create forms using new CMyForm() construction instead of app.CreateForm(&form) one). Important note: child forms should be created only after you set the main one; if you create all forms and after it set the main one the result will be slightly different from expected - all the forms will be independent. When the main form is being closed/destroyed another forms are being destroyed automatically and application finishes its work.
Improvements
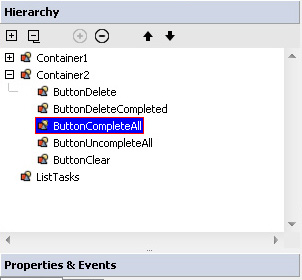
Lets now improve our application a little. The application runs and works well but if you change size of the form the widgets remain on their places and do not adjust to a new size. Lets open saved form file in the Form Builder and fix this behaviour. Most widgets have property called Align which is being used for aligning the widget on the form(or on the parent widget). If you try to change this property in existing widgets you won't get needed behaviour. We have to add new widgets to the form. For our goal there is a perfect widget called Container. This simple widget is specially designed for such a purpose as aligning groups of another widgets. Moreover, it is usually invisible and does not consume any calculation power for drawing. Lets add first container and put input field onto it. It easily could be done by selecting input field and dragging it onto a container in the hierarchy editor. In the form editor of the Form Builder you may see container having outline. Do not worry it won't be visible in the application unless you change the BackgroundColor to opaque one. Add one more container and put all buttons on it in the same way. Now we are going to set alignments. Set Align property of the first container to Top, for the second one to Right, and for the task list to Client. If you got a little unexpected result(for example the list occupy all the form space and both containers are not visible) it is not a problem. It happens because the list is being created first and containers are being created after it(just because we have added them later). The form is aligning widgets in the creation order. In this case it takes the list first, sees its alignment is set to Client and gives all available space to the list widget. When the form proceeds to the containers there are no more free space left and the containers have zero size and thus invisible. Lets fix this. All we need is to change the creation order in hierarchy editor. Select containers and list and change the creation order using buttons with arrows at the top of the hierarchy editor so that containers be before the list in the hierarchy editor. The final order should be: first container, second container, list.
Everything looks correct now. Change the width of the container with buttons so that all buttons will be completely inside it. Change Padding(free area near the edge of the container) property of the container with input field to 8(all four to the same value). Change Align of the input field to Client and adjust its parent container height to a better suited one. Now if you resize the form of running application all the widgets will adjust accordingly to new size of the form and entire form area could be properly used. Please note, we write no one line of code to archive such a behaviour.
You also can change the form's property called State to Maximized which will change the default form state to maximized(the form will occupy all the screen space) one.
There are, of course, much more details to be improved(like saving and loading tasks list, filters for hiding finished tasks, etc.) but for the first acquaintance with the framework all written above is enough.