Tutorial: dialog boxes. Part 1
In the beginning we will repeat process of creating and configuring empty project for the application which you have already done twice if you follow tutorials order. After that we will explain usage of existing widgets having forms/dialog boxes on the example of ColorDialog widget. You will also learn how to make your forms completely compatible with both dialog box and regular standalone modes.
This tutorial shows how to work with Nitisa downloaded as source code. If you wish to follow it using Nitisa extension for Visual Studio, you may find useful information about creating project and forms in this tutorial. All other remains the same and you may follow steps of this tutorial skipping manual creation of form and project as you can do it using Nitisa extension templates instead.
Prepare framework
We will start with preparing the Nitisa framework for working with it. If you were following our tutorials you already know how to do it and if you have already done this, you may skip this chapter.
-
Go to Download link at the top of the page.

-
Click download button on the latest version of the Nitisa framework to download it.

-
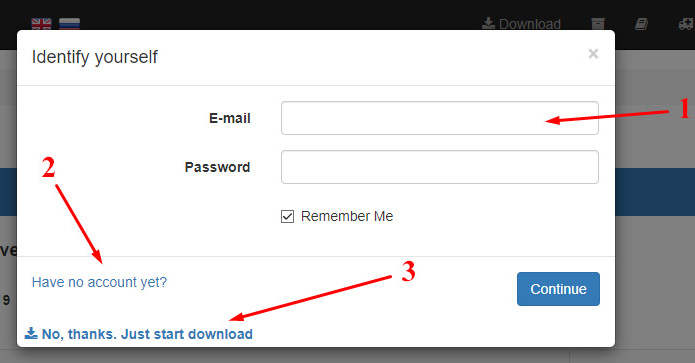
If you are authorized, download will start immediately. If you are not authorized, following popup will appear where you can sign-in(1), sign-up(2) or just download framework anonymously(3). Click on No, thanks. Just start download link to start downloading file.
-
Unpack downloaded file into the root of drive C: folder. You can actually unpack it wherever you like just don't forget to change the path in the following explanations accordingly. The downloaded archive has a folder called Nitisa-9.0.0 inside so the unpacked framework will be in C:\Nitisa-9.0.0 folder. If you download another version then version part of the folder name(9.0.0) can be different.
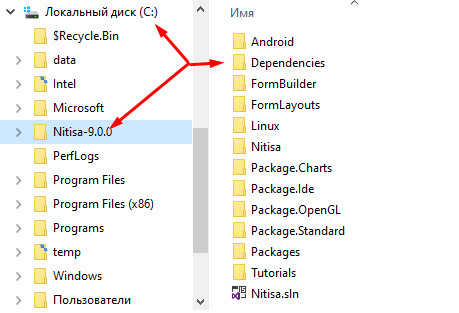
- Open the framework solution file called Nitisa.sln(you can see it at the image above at the right bottom part) in Visual Studio.
-
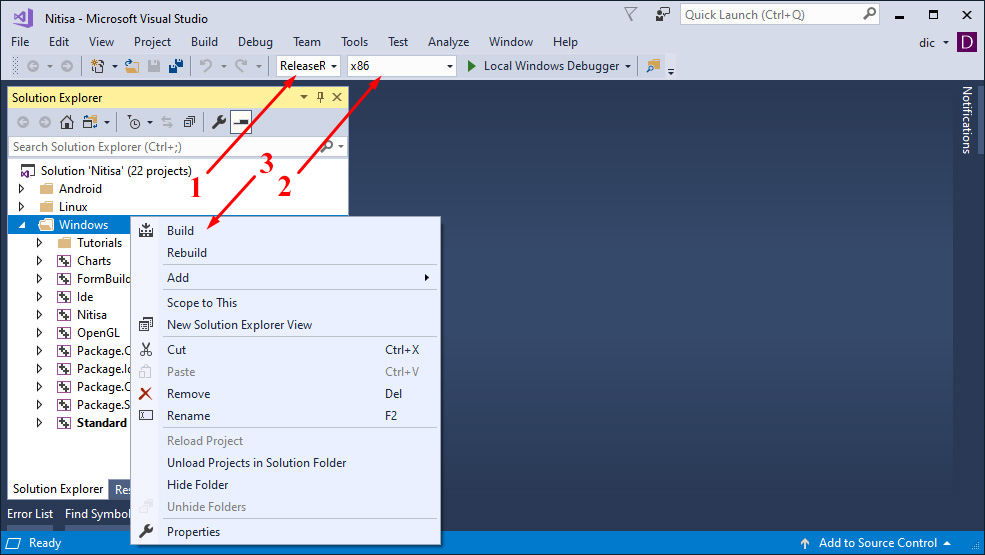
Select ReleaseRT configuration(1) and x86 platform(2) and build it by right clicking on Windows solution folder and click on Build option(3). We will create only Windows applications. If you wish, you can build entire solution which also contains projects for Android and Linux platform. For the Linux platform you will have to setup connection to the Linux machine(either real or virtual one). Also corresponding Visual Studio components should be installed.
-
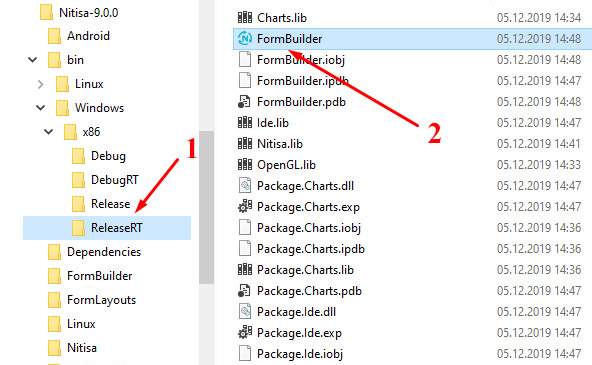
In several minutes building of the framework will be finished and Form Builder application(2), which we will use for creating forms and dialog boxes, will be created in the C:\Nitisa-9.0.0\bin\Windows\x86\ReleaseRT folder(1).
-
Change configuration to Debug and build Windows folder of the solution again. In several minutes building will be finished and framework library files will be created in the C:\Nitisa-9.0.0\bin\Windows\x86\Debug folder.
Here we run build twice. First one for creating of the executable file of the Form Builder and second one for creating framework library files which we will link with our applications. Of course we could omit second build and use library files from the C:\Nitisa-9.0.0\bin\Windows\x86\ReleaseRT folder. But it is better to use debug libraries while creating and debugging your applications and then, when everything was thoroughly tested, switch to release version and build final applications working with best speed.
Create empty project
After preparing Nitisa framework we will continue with creating empty project for our application. If you were following our tutorials you already know how to do it. Anyway we will repeat it again so that tutorial be complete.
-
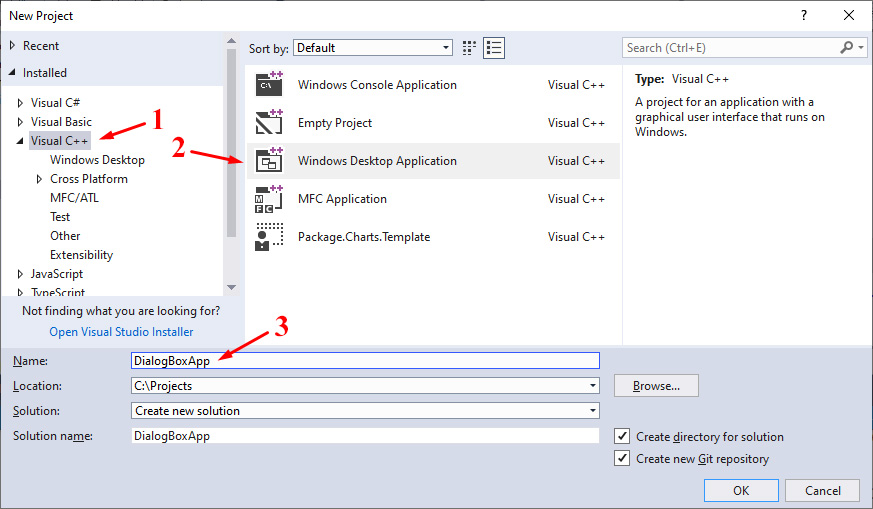
Create new Windows Desktop Application project(2) from Visual C++ templates(1) in Visual Studio. Give it name DialogBoxApp(3). We also assume your solutions are in the C:\Projects folder. If no, you know what to do: just take into consideration your real folder name when following tutorial steps.
-
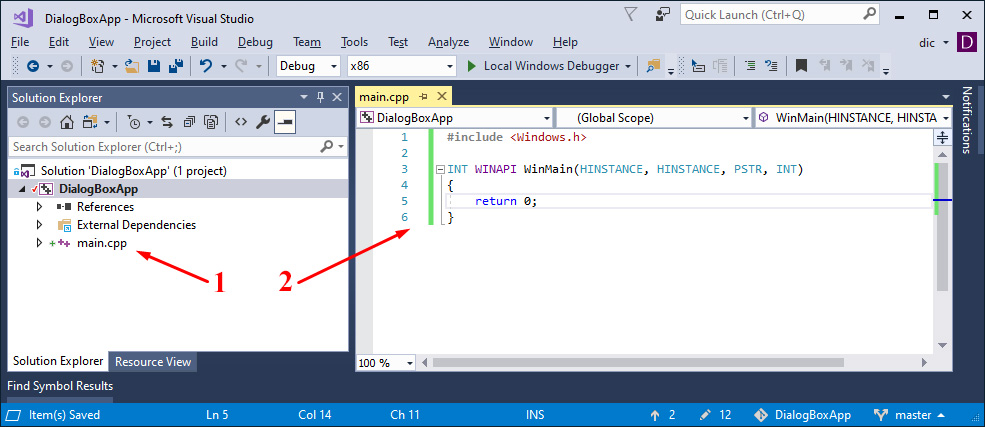
Remove all files and folders from solution(permanently) and add to the solution new source file called main.cpp(1). Put into this file standard WinMain function code(2).
-
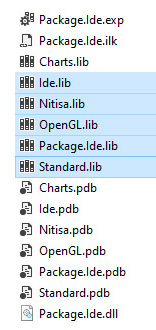
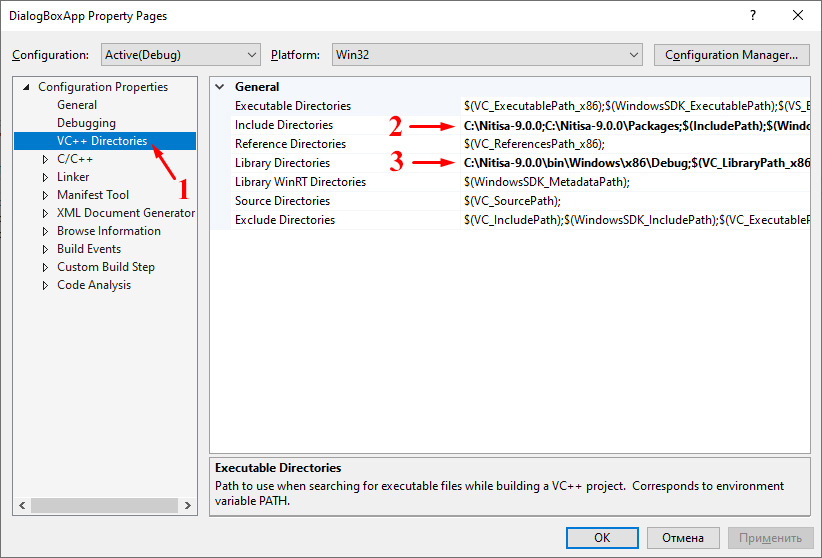
Right click on the project name and click on Properties option or open Projects menu and click on Properties option to open project settings interface. Select VC++ Directories at the right(1) and add Nitisa folder path and Packages folder inside it to the Include Directories as shown on image below(2). Add folder of the Nitisa libraries to the Library Directories as well(3). By this step we tell Visual Studio where it should look Nitisa include and library files when compiling the application. We have shown a most common way of doing so: all is required is to tell where framework and its packages folders are and where built(remember previous chapter) library files are. When you will have different project configurations and platforms you will need only to change library folder depending on your settings.
-
Go to C/C++ → Code Generation and change Runtime Library to Multi-threaded Debug (/MTd) as shown below. We built framework in Debug configuration in previous chapter. In this configuration such Runtime Library is used. If you will build and use DebugRT or ReleaseRT you will need to change Runtime Library option of you application accordingly to Multi-threaded Debug DLL(/MDd) or to Multi-threaded DLL (/MD) respectfully. So, the Runtime Library option of your application configuration should be equal to the option of the Nitisa's libraries you use were built.

-
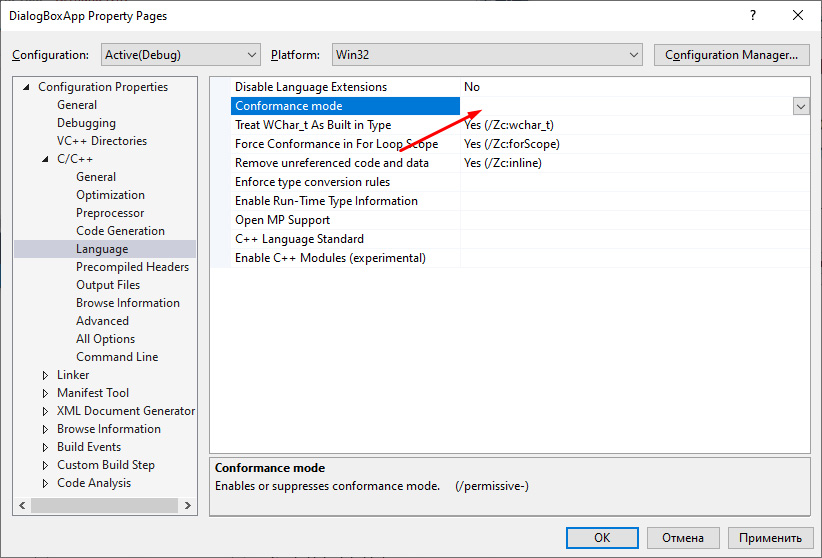
Go to C/C++ → Language and remove any value from Conformance mode option. Changing this option is not required and it is not related to the framework but you might face with compilation errors in some Windows header files if left it default.
-
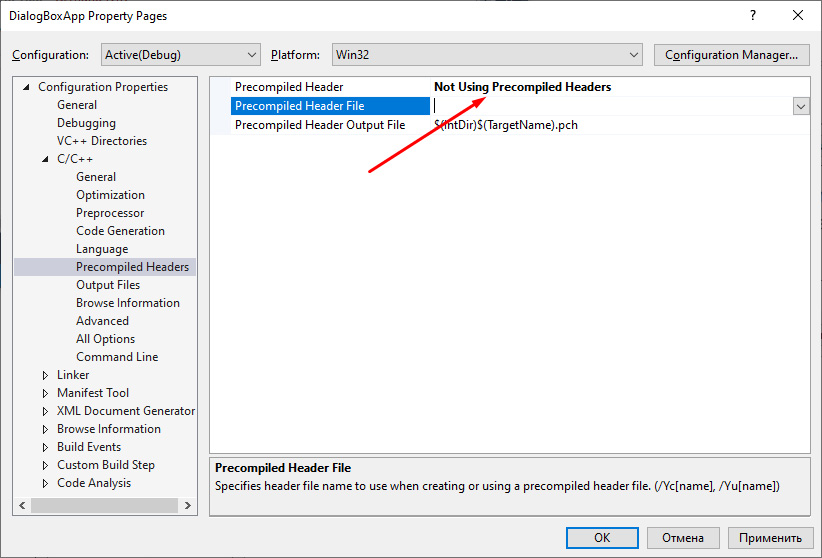
Go to C/C++ → Precompiled Headers and change Precompiled Header option to Not Using Precompiled Headers. Also clear the Precompiled Header File option. You, of course, may want to use precompiled headers and it is okay with the Nitisa framework. We won't use it for simplicity only.
-
Apply changes and close project configuration interface. The configuration is finished. You even can build the project to check if there are no errors at this point. If you did everything as described above it will be compiled and linked successfully and you will see DialogBoxApp.exe file of your application in C:\Projects\DialogBoxApp\Debug folder.

This simple process of empty project creation is always the same with Nitisa. The only differences that may be here is using different folders and Runtime Library option. You can even make such empty project once, export is as template, and then use the template as starting point of your applications.
Using widgets in dialog box mode
Some existing widgets, as you might already observed, show dialog forms to receive user action. For example, FindDialog shows form for searching a text, SysOpenDialog widget shows a form for selecting a file, and so on. Some of such widgets can work both in dialog box mode and as standalone forms. They use form mode by default. One of these widgets is ColorDialog widget which is used to show color selection interface. Lets see first how to use it by default.
- Open the Form Builder. As you may remember from the first chapter the file is C:\Nitisa-9.0.0\bin\Windows\x86\ReleaseRT\FormBuilder.exe
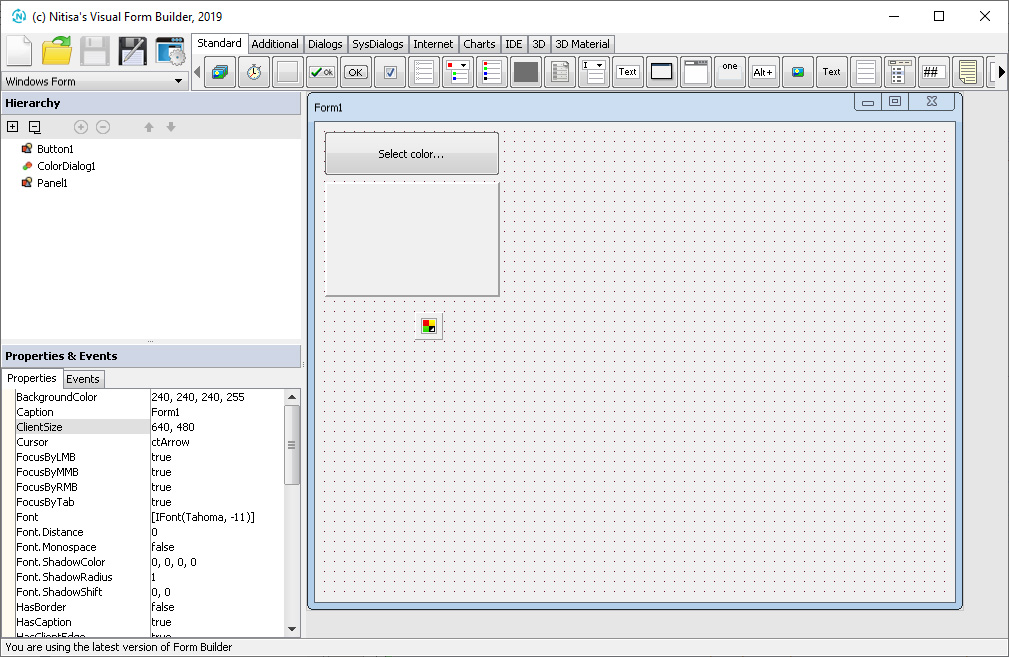
- Put Button widget on the form.
- Set Caption of the button to Select color....
- Double click on OnClick event of the button to generate event name.
- Put ColorDialog widget from the Dialogs tab on the form.
- Set Name of the form to FormMain
- Put Panel widget on the form.
- Set panel's Caption property to empty string.
- You may also move end resize button, panel, and form for better look like shown on image below.
- Save form into your project folder into file FormMain.nfr. When we save form in the Form Builder, it also generate header file with form prototype class called I + name of the form + .h. In our case the file will be called IFormMain.h.
By this simple steps we created a form for our application which will show color selection dialog when user clicks on button and show selected color on the panel on the form.
Now switch to the Visual Studio with empty project we created earlier and do following:
-
Add new header file called FormMain.h to the project and put into it following content. This file is a header file with declaration of our form. We have added plenty of comments here so you will easily understand what each line means.
#pragma once // Include file with form prototype which was generated by Form Builder when we saved the form #include "IFormMain.h" // As we develop with Nitisa framework we can simply put everything into this namespace to avoid adding it everywhere or adding "using namespace nitisa" namespace nitisa { // By default Form Builder generate form prototype class in this namespace. So we put our form final class inside it as well namespace app { // This is our form class which should be derived from the form prototype class generated when we saved the form in Form Builder class CFormMain :public IFormMain { protected: // Here are the methods which will be called when different events will happen. We added one when double clicked on button's "OnClick" event. // If your form has many events it is easy to forget about some of them. We recommend just open form prototype header file, find there "protected" section, and see all the methods you need. void Button1_OnClick(IControl *sender) override; public: // Form's constructor CFormMain(); }; // Variable where we will store form instance extern CFormMain *FormMain; } } -
Add new source file called FormMain.cpp to the project and put into it following content. This file contains implementation of the methods of our form we declared in the header file. This file also has many comments for better understanding what is going on there.
// Include header file with platform window management class #include "Platform/Core/Window.h" // Include header file with platform OpenGL renderer #include "Platform/Core/Renderer.h" // Include declaration of our form #include "FormMain.h" namespace nitisa { namespace app { // Global variable for the form instance. Will be used later CFormMain *FormMain{ nullptr }; // Form constructor CFormMain::CFormMain() : // Calling of parent class constructor. It should be supplied with platform window and renderer objects IFormMain(CWindow::Create(), CRenderer::Create()) { // We need not to do anything here // All the initialization and UI creation is done in the parent IFormMain class generated by the Form Builder } // Method called when user click on button void CFormMain::Button1_OnClick(IControl *sender) { // Show color selection interface. Method returns "true" if user accept selected color if (m_pColorDialog1->Execute()) // If user accepted selected color, set panel background color to the selected one m_pPanel1->setBackgroundColor(m_pColorDialog1->getColor()); } } } -
Edit main.cpp file so its content equals to the code below. This is a standard part for all applications created with Nitisa.
#include <Windows.h> // Include file with platform application manager #include "Platform/Core/Application.h" // Include file with our form declaration #include "FormMain.h" // Tell the linker we want to link with the framework's core library. Mandatory #pragma comment(lib, "Nitisa.lib") // Tell the linker we want to link with the Standard package library as we use widgets from this package // When we use widgets on the form from some package we should link our application with the library of that package // Libraries for linking can also be specified in the project settings but we prefer doing this in this way as it is more informative #pragma comment(lib, "Standard.lib") // Tell the linker we want to link with platform-dependent code library. Required in most cases #pragma comment(lib, "Platform.lib") #pragma comment(lib, "opengl32.lib") // Add linking with OpenGL library int WINAPI WinMain(HINSTANCE, HINSTANCE, PSTR, INT) { nitisa::CApplication app; // Create application app.CreateForm(&nitisa::app::FormMain); // Create our form. Having variable for it makes it possible to use "CreateForm" but it can also be created as usual with "new" operator app.setMainForm(nitisa::app::FormMain); // Tell the application the form is the main form of the application app.Run(); // Run application return 0; } -
Now you can build and run the application. When you click on Select color... button an interface for choosing a color appears and if you click on OK button there the panel color will be changed to the selected color.
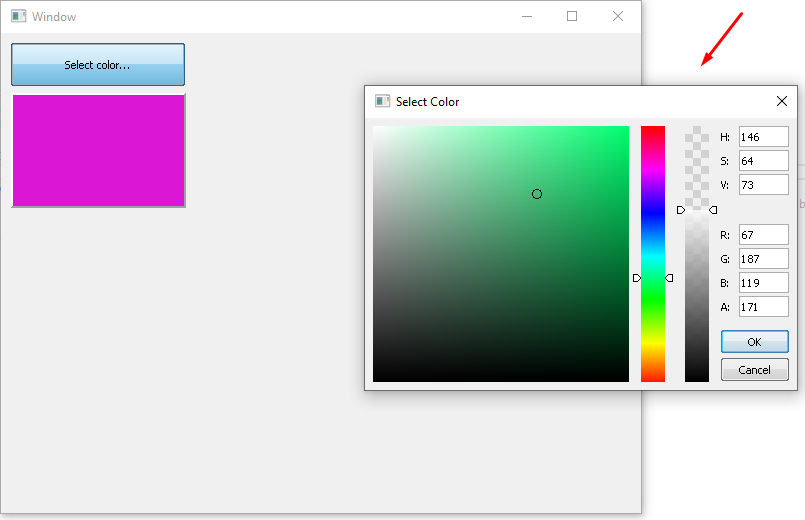
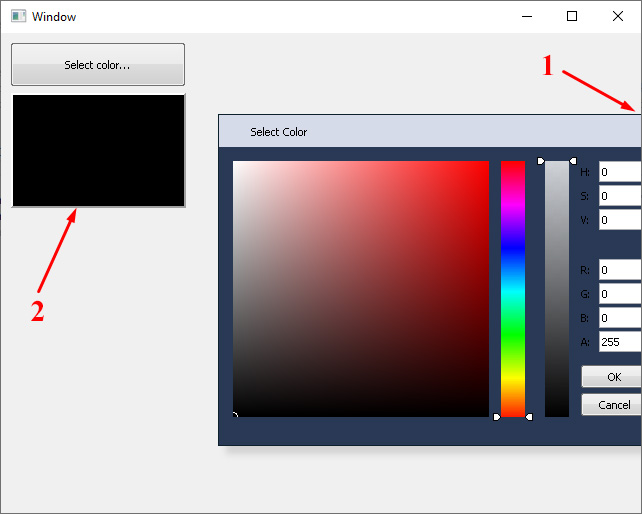
This is how ColorDialog widget looks and works by default. As you may see it creates standalone form. You may move it wherever you want, even outside of the main form, even on another display. Additionally you cannot interact with the main form until you close color selection form.
-
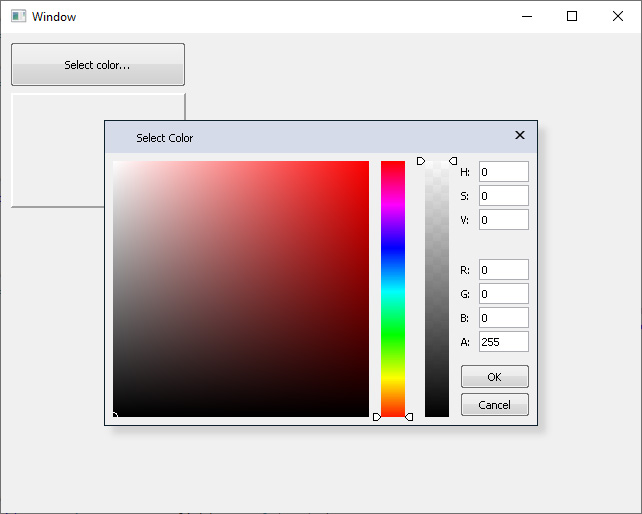
Switch to the Form Builder application where our form is still opened or open Form Builder again and open the form if you closed it. Change ColorDialog's property UseDialogBox to true and save the form. You can still build and run the application without any changes but if you run it you will definitely notice the changes.
First of all color selection interface looks a little bit different now. In dialog box mode it uses some widget as base class rather than a form. The widget for this purpose is called DialogBoxEx and is a part of Standard package. That widget has default layout different from a default layout of a form. That is the explanation of a little bit different view. You may also use this widget as a base when developing your own dialog boxes or use another ones available or create your owns.
The next difference is that the Execute() method of ColorDialog returns true immediately and do not wait until user accepts color selection. You can see it by changing panel color to black one which is the default color of the ColorDialog. And now when user accept color selection panel color won't change. We will explain how fix it shortly.
Next difference is that color selection interface in dialog box mode can not be moved outside application form as you can see on the image above. As dialog box is just a widget it cannot draw itself outside form area.
And the final major difference is a user can still close, move, and resize application form although one cannot interact with form's widgets. This is standard behaviour but it can be changed if you like in any way you prefer.
Lets now see how to fix color selection accepting. Dialog boxes like forms have method Show() and ShowModal(). The first one works for both in the same way. The second one in case of a form waits until form closes and result of the method calling is the result with which form is closed but for dialog box it returns immediately. ColorDialog widget uses Color Form. In regular mode it is a standalone form while in dialog box mode it is implemented as dialog box. Method Execute() of the ColorDialog just uses the ShowModal() method of the form and thus it returns immediately in the dialog box mode in the same way the ShowModal() method does. To be informed when user accept color selection a listener may be used. Lets see how to add and use it.
-
Add following class declaration into private section of the
CFormMainclass in the FormMain.h file. By this step we declare listener class.// This small class implements listener to be used to get notification about accepting color selection by a user // Class should implement IColorDialogListener interface, so it should be derived from it class CColorDialogListener :public virtual standard::IColorDialogListener { private: // In this member will be stored a pointer to our form CFormMain *m_pForm; public: // Listener has only one method which will be called when user accepts color selection and we will use it to update panel's color void OnApply(standard::IColorDialog *sender) override; // Constructor CColorDialogListener(CFormMain *form); }; -
Add line of code
CColorDialogListener m_cColorDialogListener;as well into private section of the form class right after listener class declaration. -
Change FormMain.cpp file so it will be the same as code below. We just add simple listener class methods implementation, listener member proper constructor into forms constructor, added assigning of a listener to ColorDialog widget, and changed button notification code a little.
// Include header file with platform window management class #include "Platform/Core/Window.h" // Include header file with platform OpenGL renderer #include "Platform/Core/Renderer.h" // Include declaration of our form #include "FormMain.h" namespace nitisa { namespace app { // Global variable for the form instance. Will be used later CFormMain *FormMain{ nullptr }; // In constructor we just store pointer to a form CFormMain::CColorDialogListener::CColorDialogListener(CFormMain *form) : m_pForm{ form } { } // When color selection is confirmed we update panel color void CFormMain::CColorDialogListener::OnApply(standard::IColorDialog *sender) { m_pForm->m_pPanel1->setBackgroundColor(m_pForm->m_pColorDialog1->getColor()); } // Form constructor CFormMain::CFormMain() : // Calling of parent class constructor. It should be supplied with platform window and renderer objects IFormMain(CWindow::Create(), CRenderer::Create()), // Create listener sending pointer to the form to it m_cColorDialogListener{ this } { // We need not to do anything here // All the initialization and UI creation is done in the parent IFormMain class generated by the Form Builder // Assign listener to ColorDialog m_pColorDialog1->setColorDialogListener(&m_cColorDialogListener); } // Method called when user click on button void CFormMain::Button1_OnClick(IControl *sender) { // Show color selection interface m_pColorDialog1->Execute(); } } } - Build and run the application. Now you can see that we have got a proper behaviour when user accepts color selection and panel does not change color immediately after clicking on button anymore.
That is how we can handle accepting color in dialog box mode of the ColorDialog widget. By the way, this modification of the code will also work if you change UseDialogBox property to false again.
As you may notice we still have some issues with color selection layout interface. Particularly we would like it to have the same background color as our main form have and if you take a close look you will see that its right and bottom distance from widgets to dialog box right and bottom borders differs from the distance to left and top ones. This is a common minor issue for all dialog boxes derived from DialogBoxEx when they were created via Form Builder. The issue raises from different default layout settings of a form and the DialogBoxEx widget. But there is an easy fix for it. Lets fix both this issues in the following way.
-
Add following include into FormMain.cpp file right after including renderer header file. By this line we includes a declaration of color selection dialog box, which is being used by ColorDialog widget, to our file.
#include "Standard/Forms/Color/DialogBoxColor.h" -
Add following two lines of code into
Button1_OnClickmethod of the form right after showing color selection interface byExecute()method. The first line sets proper background color to the dialog box with color selection interface and the second line just adjust it's size and position.m_pColorDialog1->getDialogBox()->setBackgroundColor(getBackgroundColor()); m_pColorDialog1->getDialogBox()->AutoResize(true);
If you run application and clicks on Select color... button you will see the changes. Color selection interface background looks now more like the main form and its padding is equal from all the sides.
! The only one important note we have here states that for optimization reasons dialog box of the ColorDialog widget, and all the widgets which uses dialog boxes, may not be accessible until its showing is requested. That is why we access it and change its properties and call its methods after calling Execute() of ColorDialog but not before.
And a final improvement here we would like to show is checking whether ColorDialog is in dialog box mode or not before accessing its dialog box as well as checking if Execute() method was called successfully. This final change makes our simple form completely compatible with both dialog box and standalone form modes and makes our code universal which means in does not require any changes when we change between those two modes. All is required in this case is building the project and that is all. You may also see that we added m_bDialogBoxAdjusted boolean type member(initially set to false in form's constructor) to prevent adjusting dialog box each time user clicks on Select color... button. This is an optimization trick as after the first adjustment dialog box remains in the proper state and no new adjustment is required.
// Method called when user click on button
void CFormMain::Button1_OnClick(IControl *sender)
{
    // Show color selection interface and adjust dialog box if required and dialog box mode is on
    if (m_pColorDialog1->Execute() && m_pColorDialog1->isUseDialogBox() && !m_bDialogBoxAdjusted)
    {
        // Set background color of the dialog box to the color our form has
        m_pColorDialog1->getDialogBox()->setBackgroundColor(getBackgroundColor());
        // Automatically adjust dialog box size and position
        m_pColorDialog1->getDialogBox()->AutoResize(true);
        // Set flag so we do not adjust dialog box size and position each time when color selection interface is being shown
        m_bDialogBoxAdjusted = true;
    }
}
This method shows using a listener. There is another method: using OnApply event of ColorDialog widget. We wanted to show you how to use listeners as all dialog boxes you will create and use have only listener method of getting information and have no corresponding events like in case of ColorDialog.
You can find source code of the project we just completed in the Windows → Tutorials → DialogBox folder of the Nitisa solution. It is called TestColorDialog.