Tutorial: dialog boxes. Part 2
In this, the second, article we will show how to create and use your own dialog boxes. We will explain differences and similarities in developing using dialog boxes to developing using standalone forms. We also will show how your project may be prepared to work with both modes. In this tutorial we are also going to show how to use Tag property of widgets, which is designed to be used as user defined data storage and may store data of different types.
About the project
Main form layout
Product add/edit form layout
Confirmation form layout
Confirmation form source code
Product add/edit form source code
Main form source code
Application source code
Adjusting to support both modes
Conclusion
About the project
Forms in dialog box mode works like child forms for the main one where they are located and framework's CForm class, which is a base class for all your application standalone forms, handles such behaviour automatically. Lets call form in dialog box mode just dialog box for simplicity. We are now going to create a simple project for managing goods which will use modal interface for adding and modifying a product and modal interface for delete products confirmation.
Main form layout
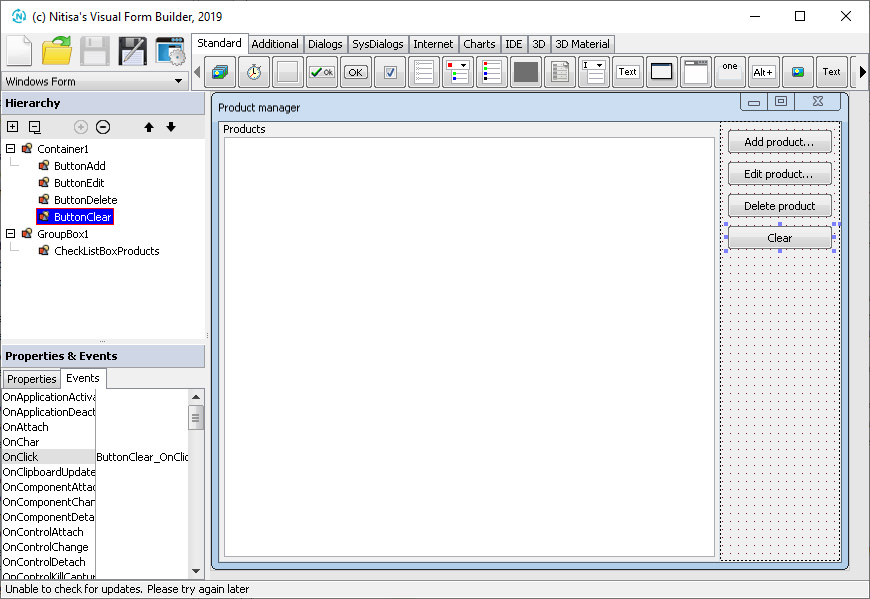
We start by creating main(standalone) form for our project. Each application usually has at least one form called the main form. It appears when application starts and contains most important view used in application. Our main form will have list of products and buttons for managing them. Lets start.
- Create empty project as described in the first part of the tutorial. You may chose any name your want for it.
- Open Form Builder or start a new form if it is already opened.
- Set form's Name property to FormMain. We do not use {type} placeholder as the form is always supposed to be regular form.
- Set form's Caption property to Product manager.
- Set form's State property to Maximized. Let it initially be maximized(take entire display client area).
- Put Container widget onto the form.
- Set container's Align property to Right.
- Set container's UseMask property to false. It is good optimization practice to disable using a mask when it is not required(child widgets are never outside of the container's client area).
- Put Button widget onto the container.
- Set button's Name property to ButtonAdd.
- Set button's Caption property to Add product....
- Generate name for button's OnClick event by double clicking on its empty value.
- Put another Button widget onto the container.
- Set its Name property to ButtonEdit.
- Set its Caption property to Edit product....
- Generate name for new button's OnClick event.
- Put one more Button widget onto the container.
- Set its Name property to ButtonDelete.
- Set its Caption property to Delete products.
- Generate name for new button's OnClick event.
- Put last one Button widget onto the container.
- Set its Name property to ButtonClear.
- Set its Caption property to Clear.
- Generate name for new button's OnClick event.
- Put GroupBox widget onto the form.
- Set its Align property to Client.
- Set its UseMask property to false.
- Set its Caption property to Products.
- Put CheckListBox widget onto the group box.
- Set its Name property to CheckListBoxProducts.
- Set its Align property to Client.
- You may change position of buttons and size of container to get layout like shown on the image below.
- Save the form into the project folder with name FormMain.nfr. Before saving ensure that Export as option in the Form Builder configuration is set to Form.
The main form layout is ready. We will add some code implementing its logic later.
Product add/edit form layout
In this chapter we will create a form for editing information about product.
- Create new form in the Form Builder by clicking on New Form.
- Open configuration of the Form Builder by clicking on Configuration button.
-
Change option Export as to DialogBox(1) and in a dropdown below select [Standard] DialogBoxEx(2) widget. That widget is the standard widget designed to be a base for custom dialog boxes. By the way, this widget is also available as regular one on the Additional tab.
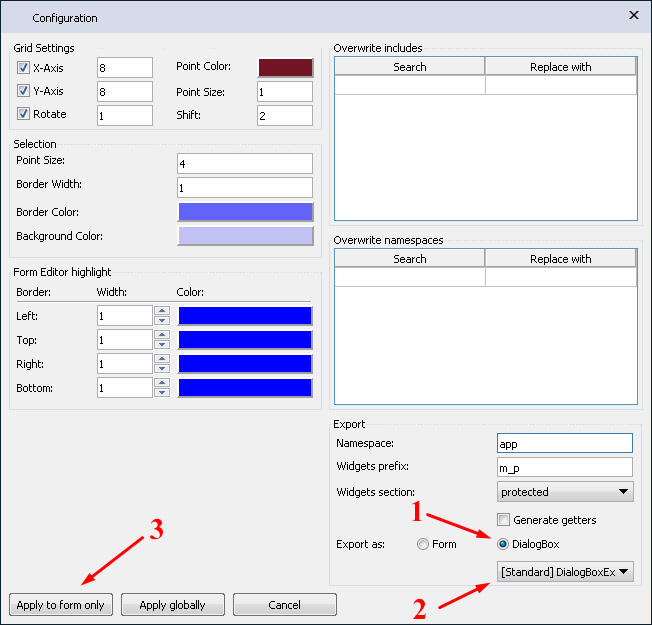
- Click on the Apply to form only button(3) to apply changes to this form only. By this step we also tells that the configuration will be stored in the form file when we save it and every time we open it in the Form Builder it will apply those settings.
- Set form's Name property to {type}Product. We have intention to use it as regular form as well later to show how to prepare your source code to be used both in dialog box and standalone form modes.
- Set form's HasMaximizeBox property to false as the form will have fixed size.
- Set form's HasMinimizeBox property to false to disable minimizing it.
- Set form's HasSizeBox property to false so that its size can not be changed by user.
- Set form's State property to Hidden as the form will initially be invisible.
- Set form's WindowPosition property to MainFormCenter so that when the form will be shown for the first time it will be placed at the center of the main form.
- Add Label widget to the form.
- Set labels's Caption property to Name:.
- Add another Label widget to the form.
- Set its Caption property to Price:.
- Add one more Label widget to the form.
- Set its Caption property to Quantity:.
- Add Edit widget to the form.
- Set edit's Name property to EditName.
- Add another Edit widget to the form.
- Set its Name property to EditPrice.
- Add one more Edit widget to the form.
- Set its Name property to EditQuantity.
- Add UpDownEx widget from the Additional tab to the form.
- Set its Name property to UpDownExPrice.
- Set its AssignedTo property to EditPrice. You will see how it places itself near the EditPrice widget and changes its size and edit's value as well.
- Set its Max property to 1000. This will be the upper limit for a product price.
- Set its Min property to 0. This will be the lower limit for a product price.
- Set its Step property to 0.5. Price will be changed for 0.5 via scroll or clicking on widget arrows.
- Set its Signs property to 2 indicating how many signs after dot will be shown in the associated edit widget.
- Add UpDown widget from the Standard tab to the form.
- Set its Name property to UpDownQuantity.
- Set its AssignedTo property to EditQuantity.
- Set its Max property to 1000. This will be the upper limit for a product quantity.
- Set its Min property to 0. This will be the lower limit for a product quantity.
- Add Button widget to the form.
- Set its Name property to ButtonOk.
- Set its Caption property to OK.
- Generate its OnClick event name.
- Add another Button widget to the form.
- Set its Name property to ButtonCancel.
- Set its Caption property to Cancel.
- Generate its OnClick event name.
- You may adjust form and widgets sizes and positions so it looks like on the image below.
- Save the form into the project folder with FormProduct.nfr file name.

As you may have noticed we did not set form's caption and value of the name's edit widget. We did it on purpose. Caption of the form will depend on whether a new product is being added or an existing one is being edited. As well name edit widget's text will be set on form showing.
Confirmation form layout
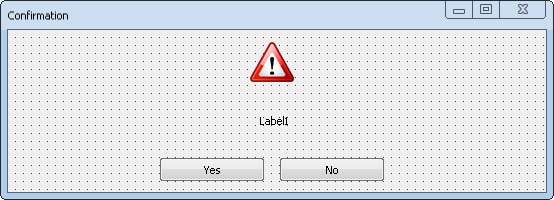
Lets now create layout for the final form of the project. This form will be used to show confirmation interface when user is going to delete a product or all products from the list.
- Create new form in the Form Builder by clicking on New Form.
- Open configuration of the Form Builder by clicking on Configuration button. If you didn't close Form Builder after finishing with the product form it will still have its configuration settings.
- Change configuration in the same way it was for the product form and click Apply to form only button. Even if configuration remains the same you need to click the apply button to apply changes to the new form.
- Set form's Name property to {type}Confirm.
- Set form's HasMaximizeBox property to false as the form will have fixed size.
- Set form's HasMinimizeBox property to false to disable minimizing it.
- Set form's HasSizeBox property to false so that its size can not be changed by user.
- Set form's State property to Hidden as the form will initially be invisible.
- Set form's WindowPosition property to MainFormCenter so that when the form will be shown for the first time it will be placed at the center of the main form.
- Set form's Caption property to Confirmation.
- Add Image widget to the form.
- Load picture attention.png into its Image property. You can find the picture in the framework's folder Tutorials\DialogBox\ProductManager.
- Set its BorderWidth property to 0, 0, 0, 0.
- Add Label widget to the form.
- Resize it so it width equals to the width of the form.
- Set its Name property to LabelMessage.
- Set its CaptionHorizontalAlign property to Center.
- Add Button widget to the form.
- Set its Name property to ButtonYes.
- Set its Caption property to Yes.
- Generate name for button's OnClick event.
- Add another Button widget to the form.
- Set its Name property to ButtonNo.
- Set its Caption property to No.
- Generate name for new button's OnClick event.
- You may adjust form and widgets sizes and positions so it looks like on the image below.
- Save the form into the project folder with FormConfirm.nfr file name.
We have finished with layout for our application's forms. Lets now write some code.
Confirmation form source code
We start adding source code for our forms in reverse order because the latest two forms are more or less independent and the first(main) one depends on them both. Lets start creating confirmation form.
- Create new header file in the project and call it DialogBoxConfirm.h.
-
Put following code into this file. The code is simple enough and has comments to each line so it won't be a problem for you to understand.
#pragma once // Include header file with form prototype in dialog box mode #include "IDialogBoxConfirm.h" // Namespace where everything of the Nitisa framework is namespace nitisa { // Our application namespace. The same namespace where Form Builder put form prototype in namespace app { // Confirmation dialog box class derived from confirmation dialog box prototype class CDialogBoxConfirm :public IDialogBoxConfirm { protected: // This method will be called when user clicks on "Yes" button void ButtonYes_OnClick(IControl *sender) override; // This method will be called when user clicks on "No" button void ButtonNo_OnClick(IControl *sender) override; public: // Constructor to create dialog box and put it onto a form CDialogBoxConfirm(IForm *parent); // Method for showing dialog box with specified message void Execute(const String &message); }; } } - Create new source file in the project and call it DialogBoxConfirm.cpp.
-
Put following code into this file. The file just contains implementation of the methods of the confirmation dialog box class. As you can see it is unbelievably simple. It has more comments then code itself!
// Include header file with dialog box class declaration
#include "DialogBoxConfirm.h"

namespace nitisa
{
    namespace app
    {
        CDialogBoxConfirm::CDialogBoxConfirm(IForm *parent) :
            // In the constructor we should only call parent class constructor
            IDialogBoxConfirm(
                L"DialogBoxConfirm", // Our dialog box class name
                true, // Dialog box can be placed onto a form directly
                false, // Dialog box cannot be placed onto another widget
                false, // Dialog box cannot be focused
                false) // and as it cannot be focused "tab_stop" has no meaning, just put false
        {
            // Put dialog box onto specified form
            setForm(parent);
        }

        void CDialogBoxConfirm::ButtonYes_OnClick(IControl *sender)
        {
            // When user clicks on "Yes" button set dialog box showing result to "mrYes"
            // This will close dialog box automatically
            setModalResult(ModalResult::Yes);
        }

        void CDialogBoxConfirm::ButtonNo_OnClick(IControl *sender)
        {
            // When user clicks on "No" button set dialog box showing result to "mrNo"
            // This will close dialog box automatically
            setModalResult(ModalResult::No);
        }

        void CDialogBoxConfirm::Execute(const String &message)
        {
            // Show message on the label we added especially for this purpose
            m_pLabelMessage->setCaption(message);
            // Show dialog box as modal one
            ShowModal();
        }
    }
}
Product add/edit form source code
The second form/dialog box we are going to implement is the form for adding or editing product. This one is a more complicated than previous form but not much as you will see now.
- Create new header file in the project and call it DialogBoxProduct.h.
-
Put following code into this file.
#pragma once // Include header file with form prototype in dialog box mode #include "IDialogBoxProduct.h" // Namespace where everything of the Nitisa framework is namespace nitisa { // Our application namespace. The same namespace where Form Builder put form prototype in namespace app { // Structure containing product information struct PRODUCT { // Product name String Name; // Product price float Price; // Product remaining quantity int Quantity; }; // Product editing dialog box class derived from product editing dialog box prototype class CDialogBoxProduct :public IDialogBoxProduct { private: // This flag will store whether a dialog box is shown in create or edit product mode // It will store value of "is_new" parameter of Execute() method bool m_bIsNew; // This method will validate whether information on dialog box is correct or not bool Validate(); protected: // This method will be called when user clicks on "OK" button void ButtonOk_OnClick(IControl *sender) override; // This method will be called when user clicks on "Cancel" button void ButtonCancel_OnClick(IControl *sender) override; public: // Constructor to create dialog box and put it onto a form CDialogBoxProduct(IForm *parent); // Return flag indicating whether a dialog box is shown in create or edit product mode bool isNew() const; // Return product information stored in dialog box PRODUCT getProduct() const; // Method for showing dialog box with specified product information void Execute(const PRODUCT &product, const bool is_new); }; } } - Create new source file in the project and call it DialogBoxProduct.cpp.
-
Put following code into this file. The file just contains implementation of the methods of the product dialog box class. Comments in it will help you understand what each line of code do.
// Include header file with dialog box class declaration
#include "DialogBoxProduct.h"

namespace nitisa
{
    namespace app
    {
        CDialogBoxProduct::CDialogBoxProduct(IForm *parent):
            // In the constructor we should only call parent class constructor. Meaning of its arguments is the same as for the confirmation dialog box
            IDialogBoxProduct(L"DialogBoxProduct", true, false, false, false),
            // Initialize flag to some correct value
            m_bIsNew{ true }
        {
            // Put dialog box onto specified form
            setForm(parent);
        }

        bool CDialogBoxProduct::isNew() const
        {
            // Just return stored value of the flag
            return m_bIsNew;
        }

        PRODUCT CDialogBoxProduct::getProduct() const
        {
            // Convert input values to PRODUCT structure
            return PRODUCT{ Trim(m_pEditName->getText()), m_pUpDownExPrice->getValue(), m_pUpDownQuantity->getValue() };
        }

        void CDialogBoxProduct::Execute(const PRODUCT &product, const bool is_new)
        {
            // Set product information into inputs
            m_pEditName->setText(product.Name);
            m_pUpDownExPrice->setValue(product.Price);
            m_pUpDownQuantity->setValue(product.Quantity);
            // Store specified flag
            m_bIsNew = is_new;
            // Show dialog box as modal one
            ShowModal();
        }

        void CDialogBoxProduct::ButtonOk_OnClick(IControl *sender)
        {
            // When user clicks on "OK" button set dialog box showing result to "mrOk"
            // This will close dialog box automatically
            // But before doing so we check whether information in inputs is valid
            if (Validate())
                setModalResult(ModalResult::Ok);
        }

        void CDialogBoxProduct::ButtonCancel_OnClick(IControl *sender)
        {
            // When user clicks on "Cancel" button set dialog box showing result to "mrCancel"
            // This will close dialog box automatically
            setModalResult(ModalResult::Cancel);
        }

        bool CDialogBoxProduct::Validate()
        {
            // If name of the product is specified as empty string
            if (Trim(m_pEditName->getText()).empty())
            {
                // Select everything in the name input
                m_pEditName->SelectAll();
                // Set name input focused
                m_pEditName->setFocus();
                // Return false as the validation failed
                return false;
            }
            // Validation passed so we return true
            return true;
        }
    }
}
As you can see the product dialog box source code is a little longer than source code of confirmation dialog box. Nevertheless it is not much complicated.
Main form source code
Finally we are ready to implement our application main form.
- As usual create new header file in the project and call it FormMain.h.
-
Put following code into this file.
#pragma once // Include header file with definition of IDialogBoxListener interface #include "Nitisa/Interfaces/IDialogBoxListener.h" // Include header file with form prototype #include "IFormMain.h" // Include header file where PRODUCT structure is defined as we use it here #include "DialogBoxProduct.h" // Namespace where everything of the Nitisa framework is namespace nitisa { // Our application namespace. The same namespace where Form Builder put form prototype in namespace app { // Inform compiler that such class exists class CDialogBoxConfirm; // Main form derived from main form prototype class class CFormMain :public IFormMain { private: // Dialog box listener we are going to use to get information from dialog boxes // It should implement IDialogBoxListener interface class CDialogBoxListener :public virtual IDialogBoxListener { private: // Pointer to the form CFormMain *m_pForm; public: // IDialogBoxListener methods we should implement void OnClose(IDialogBox *sender) override; void OnRestore(IDialogBox *sender) override; void OnMinimize(IDialogBox *sender) override; void OnMaximize(IDialogBox *sender) override; // Listener constructor CDialogBoxListener(CFormMain *form); }; // Define some constants for different actions. We will use them with confirmation dialog box const int ACTION_DELETE{ -1 }; // Action is "Delete selected products" const int ACTION_CLEAR{ -2 }; // Action is "Clear information about all products" private: // Pointer to product dialog box CDialogBoxProduct *m_pDialogBoxProduct; // Pointer to confirmation dialog box CDialogBoxConfirm *m_pDialogBoxConfirm; // Products storage std::vector<PRODUCT> m_aProducts; // Flag used to automatically resize product dialog box only once bool m_bDialogBoxProductResized; // Flag used to automatically resize confirmation dialog box only once bool m_bDialogBoxConfirmResized; // Listener for dialog boxes CDialogBoxListener m_cDialogBoxListener; // This method return product dialog box creating one if it was not created yet CDialogBoxProduct *getDialogBoxProduct(); // This method return confirmation dialog box creating one if it was not created yet CDialogBoxConfirm *getDialogBoxConfirm(); // This method shows product dialog box with specified product information void ExecuteDialogBoxProduct(const PRODUCT &product, const bool is_new, const int tag); // This method shows confirmation dialog box with specified message void ExecuteDialogBoxConfirm(const String &message, const int tag); protected: // Method called when user click on "Add product" button void ButtonAdd_OnClick(IControl *sender) override; // Method called when user click on "Edit product" button void ButtonEdit_OnClick(IControl *sender) override; // Method called when user click on "Delete products" button void ButtonDelete_OnClick(IControl *sender) override; // Method called when user click on "Clear" button void ButtonClear_OnClick(IControl *sender) override; public: CFormMain(); }; // Variable where we will store form instance extern CFormMain *FormMain; } } - Create new source file in the project and call it FormMain.cpp.
-
Put following code into this file.
// Include header file with platform window management class
#include "Platform/Core/Window.h"

// Include header file with platform OpenGL renderer
#include "Platform/Core/Renderer.h"

// Include header file with the form declaration
#include "FormMain.h"

// Include header file with confirmation dialog box declaration as we are going to use its methods
#include "DialogBoxConfirm.h"

namespace nitisa
{
    namespace app
    {
        // Global variable for the form instance
        CFormMain *FormMain{ nullptr };

        // In listener's constructor we just store pointer to a form
        CFormMain::CDialogBoxListener::CDialogBoxListener(CFormMain *form) :
            m_pForm{ form }
        {

        }

        // This method of the listener is called when dialog box is closed
        void CFormMain::CDialogBoxListener::OnClose(IDialogBox *sender)
        {
            CDialogBoxProduct *dlg;
            // Check with what result dialog box was closed
            switch (sender->getModalResult())
            {
            case ModalResult::Yes: // We close with this result when user clicks on "Yes" button in the confirmation dialog box
                // Identify what action should be performed by "Tag" property value
                if ((int)sender->Tag == m_pForm->ACTION_DELETE) // We have to delete selected products
                {
                    // Run through all products and delete them both from m_aProducts storage and widget
                    for (int i = m_pForm->m_pCheckListBoxProducts->getItemCount() - 1; i >= 0; i--)
                        if (m_pForm->m_pCheckListBoxProducts->isChecked(i))
                        {
                            m_pForm->m_aProducts.erase(m_pForm->m_aProducts.begin() + i);
                            m_pForm->m_pCheckListBoxProducts->Delete(i);
                        }
                }
                else if ((int)sender->Tag == m_pForm->ACTION_CLEAR) // We have to delete all products
                {
                    m_pForm->m_aProducts.clear();
                    m_pForm->m_pCheckListBoxProducts->Clear();
                }
                break;
            case ModalResult::Ok: // We close with this result when user clicks on "OK" button in the product dialog box
                if ((dlg = cast<CDialogBoxProduct*>(sender))) // Convert "sender" to product dialog box
                {
                    // Compose caption displayed in the widget for the product
                    String caption{ dlg->getProduct().Name + L" [" + ToString(dlg->getProduct().Quantity) + L" for $" + ToFixed(dlg->getProduct().Price, 2) + L" each]" };
                    if (dlg->isNew()) // If it was adding a product, add it
                    {
                        m_pForm->m_aProducts.push_back(dlg->getProduct());
                        m_pForm->m_pCheckListBoxProducts->Add(caption);
                    }
                    else // Otherwise it was modification of the product
                    {
                        m_pForm->m_aProducts[(int)dlg->Tag] = dlg->getProduct();
                        m_pForm->m_pCheckListBoxProducts->getItem((int)dlg->Tag)->setCaption(caption);
                    }
                }
                break;
            }
        }

        void CFormMain::CDialogBoxListener::OnRestore(IDialogBox *sender)
        {
            // We are not interesting in this notification
        }

        void CFormMain::CDialogBoxListener::OnMinimize(IDialogBox *sender)
        {
            // We are not interesting in this notification
        }

        void CFormMain::CDialogBoxListener::OnMaximize(IDialogBox *sender)
        {
            // We are not interesting in this notification
        }

        CFormMain::CFormMain():
            // Call parent constructor with platform window and renderer objects as usual
            IFormMain(CWindow::Create(), CRenderer::Create()),
            // Product dialog box is not created yet, so its pointer is empty
            m_pDialogBoxProduct{ nullptr },
            // Confirmation dialog box is not created yet, so its pointer is empty
            m_pDialogBoxConfirm{ nullptr },
            // Product dialog box was not resized yet
            m_bDialogBoxProductResized{ false },
            // Confirmation dialog box was not resized yet
            m_bDialogBoxConfirmResized{ false },
            // Listener's constructor requires form
            m_cDialogBoxListener{ this }
        {

        }

        CDialogBoxProduct *CFormMain::getDialogBoxProduct()
        {
            // If product dialog box was not created yet
            if (!m_pDialogBoxProduct)
            {
                // Create it
                m_pDialogBoxProduct = new CDialogBoxProduct(this);
                // Assign listener to it
                m_pDialogBoxProduct->setDialogBoxListener(&m_cDialogBoxListener);
                // Set its background color equals to the background color of the main form
                m_pDialogBoxProduct->setBackgroundColor(getBackgroundColor());
            }
            return m_pDialogBoxProduct;
        }

        CDialogBoxConfirm *CFormMain::getDialogBoxConfirm()
        {
            // If confirmation dialog box was not created yet
            if (!m_pDialogBoxConfirm)
            {
                // Create it
                m_pDialogBoxConfirm = new CDialogBoxConfirm(this);
                // Assign listener to it
                m_pDialogBoxConfirm->setDialogBoxListener(&m_cDialogBoxListener);
                // Set its background color equals to the background color of the main form
                m_pDialogBoxConfirm->setBackgroundColor(getBackgroundColor());
            }
            return m_pDialogBoxConfirm;
        }

        void CFormMain::ExecuteDialogBoxProduct(const PRODUCT &product, const bool is_new, const int tag)
        {
            // Assign "tag" to "Tag" property of the dialog box
            getDialogBoxProduct()->Tag = tag;
            // Set dialog box caption depending whether we add or modify a product
            getDialogBoxProduct()->setCaption(is_new ? L"Add product" : L"Edit product");
            // Show dialog box as modal one
            getDialogBoxProduct()->Execute(product, is_new);
            // If dialog box was not yet resized
            if (!m_bDialogBoxProductResized)
            {
                // Resize it
                getDialogBoxProduct()->AutoResize(true);
                // And set flag indicating it was already resized
                m_bDialogBoxProductResized = true;
            }
        }

        void CFormMain::ExecuteDialogBoxConfirm(const String &message, const int tag)
        {
            // Assign "tag" to "Tag" property of the dialog box
            getDialogBoxConfirm()->Tag = tag;
            // Show dialog box as modal one
            getDialogBoxConfirm()->Execute(message);
            // If dialog box was not yet resized
            if (!m_bDialogBoxConfirmResized)
            {
                // Resize it
                getDialogBoxConfirm()->AutoResize(true);
                // And set flag indicating it was already resized
                m_bDialogBoxConfirmResized = true;
            }
        }

        void CFormMain::ButtonAdd_OnClick(IControl *sender)
        {
            // Show product dialog box with empty product, indicating it is new product and any "tag" value as it is not used in adding a product
            ExecuteDialogBoxProduct(PRODUCT{ L"", 0.0f, 0 }, true, 0);
        }

        void CFormMain::ButtonEdit_OnClick(IControl *sender)
        {
            // If there is active row in the widget with products
            if (m_pCheckListBoxProducts->getActiveIndex() >= 0)
                // Show product dialog box with product information, indicating it is existing product and "tag" equals to the product index in widget and products storage
                ExecuteDialogBoxProduct(m_aProducts[m_pCheckListBoxProducts->getActiveIndex()], false, m_pCheckListBoxProducts->getActiveIndex());
        }

        void CFormMain::ButtonDelete_OnClick(IControl *sender)
        {
            // Check if at least one product is selected
            bool has_checked{ false };
            for (int i = 0; i < m_pCheckListBoxProducts->getItemCount(); i++)
                if (m_pCheckListBoxProducts->getItem(i)->isChecked())
                {
                    has_checked = true;
                    break;
                }
            // Only if there is at least one selected product
            if (has_checked)
                // Show delete selected products confirmation dialog box with action indicating deleting selected products
                ExecuteDialogBoxConfirm(L"Are you sure you want to delete selected products?", ACTION_DELETE);
        }

        void CFormMain::ButtonClear_OnClick(IControl *sender)
        {
            // If there are products
            if (m_pCheckListBoxProducts->getItemCount() > 0)
                // Show delete all products confirmation dialog box with action indicating deleting all products
                ExecuteDialogBoxConfirm(L"Are you sure you want to delete information about all products?", ACTION_CLEAR);
        }
    }
}
We've got quite a big files here. Let we clarify some moments which may not be obvious.
We have two dialog boxes: for product and confirmation. Each dialog box is used for two purposes. Product dialog box is used both for adding a new product and for modification of existing one. Confirmation dialog box is used both to confirm removing only selected products and to confirm removing all products. For all this diversity we have only one listener with only one OnClose() method called when a dialog box is closed(either product or confirmation one). We made a little trick when written our two dialog boxes source code. We close them with different result. When user finishes editing product information and clicks on OK button, we close dialog box with ModalResult::Ok result as you may see in the ButtonOk_OnClick method implementation in the DialogBoxProduct.cpp source file. When user confirms deletion in confirmation dialog box by clicking on Yes button we close the dialog box with ModalResult::Yes result. So in the listener's OnClose() method we can identify which dialog box was closed only by its result as we are interested only in those two actions(clicking on OK and clicking on Yes buttons). The other way we could use to identify which dialog box was closed is to try to convert sender argument to both CDialogBoxProduct and CDialogBoxConfirm class instances.
To identify which of two modes where used for each of dialog boxes we utilize the Tag property of any widget. This property can store any information and has no particular meaning for widgets. It can be used for anything you want in your source code. So, when we show confirmation of deleting only selected products we set Tag value to ACTION_DELETE constant and when we show dialog box for confirmation of deleting all products we set Tag value to ACTION_CLEAR constant. We defined that constants as -1 and -2 respectfully. For the product dialog box we use Tag for storing index of the product which is being modified in the dialog box. When product dialog box is being used to add new product we use its is_new argument of the Execute() method and isNew() method to get value of the flag passed to Execute().
The other approach we could use is to create two or even four listener's. Anyway, there are a lot of different ways of getting the same result. You may chose your own path. We only wanted to show some of possible implementations.
The other thing you may be confused in is why we do not create dialog boxes together with creating main form. We could have created them in form's constructor. The way we did it in this example uses creation by request method. It means we create something only when it is really needed. In your real applications there may be a lot of different dialog boxes. Many of them will most probably not be used by user each time one runs the application and creating all of them when application starts may take a while. It will be a good optimization to avoid creation of dialog boxes(or even another forms) until it requested by a user. Creating one, requested, dialog box or form is usually fast enough operation to perform it on the fly. Thus your application would starts much faster and use much less system resources.
Application source code
The only one last thing left is to write main.cpp file code. Just copy it from below. It is absolutely the same as was in the first part of the tutorial. Most probably it will be absolutely the same for most of your projects.
#include <Windows.h>

// Include file with platform application manager
#include "Platform/Core/Application.h"

// Include file with our form declaration
#include "FormMain.h"

// Tell the linker we want to link with the framework's core library. Mandatory
#pragma comment(lib, "Nitisa.lib")

// Tell the linker we want to link with the Standard package library as we use widgets from this package
// When we use widgets on the form from some package we should link our application with the library of that package
// Libraries for linking can also be specified in the project settings but we prefer doing this in this way as it is more informative
#pragma comment(lib, "Standard.lib")

// Tell the linker we want to link with platform-dependent code library. Required in most cases
#pragma comment(lib, "Platform.lib")

#pragma comment(lib, "opengl32.lib") // Add linking with OpenGL library

int WINAPI WinMain(HINSTANCE, HINSTANCE, PSTR, INT)
{
    nitisa::CApplication app; // Create application
    app.CreateForm(&nitisa::app::FormMain); // Create our form. Having variable for it makes it possible to use "CreateForm" but it can also be created as usual with "new" operator
    app.setMainForm(nitisa::app::FormMain); // Tell the application the form is the main form of the application
    app.Run(); // Run application
    return 0;
}
Below you can find some images of working application we just finished.
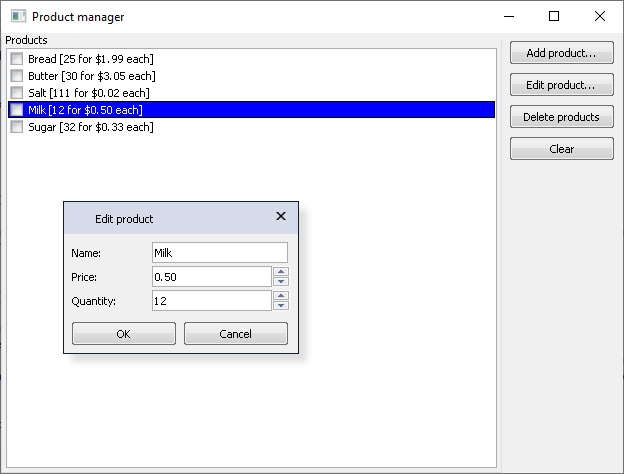
1. Product editing dialog box
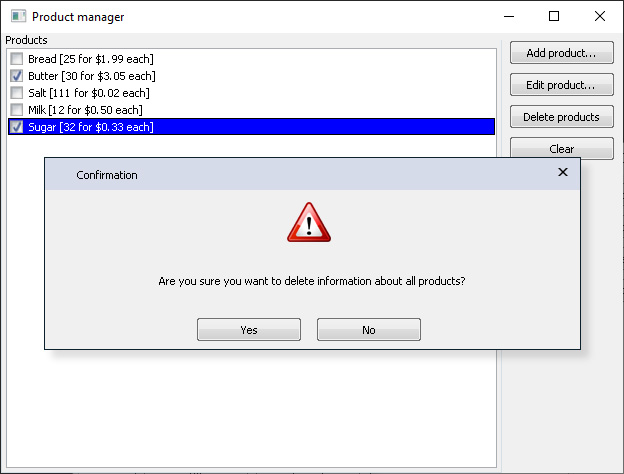
2. Delete products confirmation dialog box
Adjusting to support both modes
In this chapter we will show what can be done so that your source code support both dialog box and standalone form modes.
As you already know in dialog box mode your forms are actually widgets. So there is no way to change classes CDialogBoxProduct and CDialogBoxConfirm so that they act in one case as form and in another as dialog box. It means you should create separate implementations for form and dialog box modes. At least for those parts of classes which are not common. Lets start from adding form implementations for product and confirmation forms.
- Open FormProduct.nfr file with product form in the Form Builder.
- Open configuration and set Export as option to Form.
- Click on Apply to form only button.
- Save the form.
- Repeat previous 4 steps for FormConfirm.nfr with confirmation form.
That is all changes to form layouts we need. By changing settings and re-saving forms we got two new files generated by the FormBuilder. They are IFormProduct.h and IFormConfirm.h. Remember we used placeholder {type} for the both form names? Yes, it because of it we can have one form file and have two different prototypes in two different files. Lets now add implementation of our forms. The implementation is quite similar to the one we created above so you will easy understand it.
- Add header file called FormProduct.h to the project.
-
Put following class declaration into it. It is even simpler than was for dialog box mode as we do not need store flag for indication whether a new product is being added or an existing one is being modified. You will later see why we do not need it here anymore. And another change is that
Execute()method returns result of showing the form.#pragma once // Include header file with form prototype #include "IFormProduct.h" // Include header file where PRODUCT structure is declared #include "DialogBoxProduct.h" // Namespace where everything of the Nitisa framework is namespace nitisa { // Our application namespace. The same namespace where Form Builder put form prototype in namespace app { // Product editing form class derived from product editing form prototype class CFormProduct :public IFormProduct { private: // This method will validate whether information on form is correct or not bool Validate(); protected: // This method will be called when user clicks on "OK" button void ButtonOk_OnClick(IControl *sender) override; // This method will be called when user clicks on "Cancel" button void ButtonCancel_OnClick(IControl *sender) override; public: // Constructor CFormProduct(); // Return product information stored in form PRODUCT getProduct() const; // Method for showing form with specified product information ModalResult Execute(const PRODUCT &product); }; // Variable where we will store form instance extern CFormProduct *FormProduct; } } - Create new source file called FormProduct.cpp.
-
Put following implementation of the form into this new file.
// Include header file with platform window management class #include "Platform/Core/Window.h" // Include header file with platform OpenGL renderer #include "Platform/Core/Renderer.h" // Include header file with form class declaration #include "FormProduct.h" namespace nitisa { namespace app { // Global variable for the form instance CFormProduct *FormProduct{ nullptr }; CFormProduct::CFormProduct() : // Call parent constructor with platform window and renderer objects as usual IFormProduct(CWindow::Create(), CRenderer::Create()) { } PRODUCT CFormProduct::getProduct() const { // Convert input values to PRODUCT structure return PRODUCT{ Trim(m_pEditName->getText()), m_pUpDownExPrice->getValue(), m_pUpDownQuantity->getValue() }; } ModalResult CFormProduct::Execute(const PRODUCT &product) { // Set product information into inputs m_pEditName->setText(product.Name); m_pUpDownExPrice->setValue(product.Price); m_pUpDownQuantity->setValue(product.Quantity); // Show dialog box as modal one return ShowModal(); } void CFormProduct::ButtonOk_OnClick(IControl *sender) { // When user clicks on "OK" button set form showing result to "mrOk" // This will close form automatically // But before doing so we check whether information in inputs is valid if (Validate()) setModalResult(ModalResult::Ok); } void CFormProduct::ButtonCancel_OnClick(IControl *sender) { // When user clicks on "Cancel" button set form showing result to "mrCancel" // This will close form automatically setModalResult(ModalResult::Cancel); } bool CFormProduct::Validate() { // If name of the product is specified as empty string if (Trim(m_pEditName->getText()).empty()) { // Select everything in the name input m_pEditName->SelectAll(); // Set name input focused m_pEditName->setFocus(); // Return false as the validation failed return false; } // Validation passed so we return true return true; } } } - Add header file called FormConfirm.h to the project.
-
Put following class declaration into it. Again it is very similar to the corresponding one dialog box.
#pragma once // Include header file with form prototype #include "IFormConfirm.h" // Namespace where everything of the Nitisa framework is namespace nitisa { // Our application namespace. The same namespace where Form Builder put form prototype in namespace app { // Confirmation form class derived from confirmation form prototype class CFormConfirm :public IFormConfirm { protected: // This method will be called when user clicks on "Yes" button void ButtonYes_OnClick(IControl *sender) override; // This method will be called when user clicks on "No" button void ButtonNo_OnClick(IControl *sender) override; public: // Constructor CFormConfirm(); // Method for showing form with specified message ModalResult Execute(const String &message); }; // Variable where we will store form instance extern CFormConfirm *FormConfirm; } } - Create new source file called FormConfirm.cpp.
-
Put following implementation of the form into this new file.
// Include header file with platform window management class
#include "Platform/Core/Window.h"

// Include header file with platform OpenGL renderer
#include "Platform/Core/Renderer.h"

// Include header file with form class declaration
#include "FormConfirm.h"

namespace nitisa
{
    namespace app
    {
        // Global variable for the form instance
        CFormConfirm *FormConfirm{ nullptr };

        CFormConfirm::CFormConfirm() :
            // Call parent constructor with platform window and renderer objects as usual
            IFormConfirm(CWindow::Create(), CRenderer::Create())
        {

        }

        void CFormConfirm::ButtonYes_OnClick(IControl *sender)
        {
            // When user clicks on "Yes" button set form showing result to "mrYes"
            // This will close form automatically
            setModalResult(ModalResult::Yes);
        }

        void CFormConfirm::ButtonNo_OnClick(IControl *sender)
        {
            // When user clicks on "No" button set form showing result to "mrNo"
            // This will close form automatically
            setModalResult(ModalResult::No);
        }

        ModalResult CFormConfirm::Execute(const String &message)
        {
            // Show message on the label we added especially for this purpose
            m_pLabelMessage->setCaption(message);
            // Show form as modal one
            return ShowModal();
        }
    }
}
That is all concerning adding form mode implementation. As you can see in both dialog box and form modes implementation is very similar. The only two major differences here are following. In form mode your form class should be derived from form prototype class but in dialog box mode your form class should be derived from form prototype class in dialog box mode. Both those prototypes are being generated by the Form Builder when you save your form. Which prototype will be generated depends on Export as option of the Form Builder configuration. The second difference is a constructor. In dialog box mode prototype class has more options and they differs from the prototype of form mode. In the dialog box mode it has behaviour settings while in form mode it requires platform window and renderer objects.
Before changing main form code lets decide how we will identify which mode to use. There are plenty of possibilities. For example, we can use preprocessor option for it or use some global constant. In the Nitisa there is a standard way for letting know to entire application the dialog box mode should be used. As you might know there is only one global variable in the framework. This variable is IApplication *Application;. The IApplication interface has a property called DialogBoxes. That is what we will use to identify mode for our product and confirmation forms. If it equals to true then we will use forms in dialog box mode, otherwise we will use forms as regular forms. By default this property equals to false which means regular forms should be used. Lets for now leave this unchanged as we already have dialog box mode implemented and are going to implement form mode. Update main.cpp file to the following.
#include <Windows.h>

// Include file with platform application manager
#include "Platform/Core/Application.h"

// Include file with main form declaration
#include "FormMain.h"

// Include file with product form declaration
#include "FormProduct.h"

// Include file with confirmation form declaration
#include "FormConfirm.h"

// Tell the linker we want to link with the framework's core library. Mandatory
#pragma comment(lib, "Nitisa.lib")

// Tell the linker we want to link with the Standard package library as we use widgets from this package
// When we use widgets on the form from some package we should link our application with the library of that package
// Libraries for linking can also be specified in the project settings but we prefer doing this in this way as it is more informative
#pragma comment(lib, "Standard.lib")

// Tell the linker we want to link with platform-dependent code library. Required in most cases
#pragma comment(lib, "Platform.lib")

#pragma comment(lib, "opengl32.lib") // Add linking with OpenGL library

int WINAPI WinMain(HINSTANCE, HINSTANCE, PSTR, INT)
{
    nitisa::CApplication app; // Create application
    app.CreateForm(&nitisa::app::FormMain); // Create our form. Having variable for it makes it possible to use "CreateForm" but it can also be created as usual with "new" operator
    app.setMainForm(nitisa::app::FormMain); // Tell the application the form is the main form of the application
    if (!app.DialogBoxes) // If regular form mode should be used
    {
        app.CreateForm(&nitisa::app::FormProduct); // Create product adding/editing form
        app.CreateForm(&nitisa::app::FormConfirm); // Create product removing confirmation form
    }
    app.Run(); // Run application
    return 0;
}
Here we added including files with product and confirmation forms and creating these forms if regular form mode should be used. That's all the changes to the file. Lets now modify following parts of the FormMain.cpp file.
-
Add including of product and confirmation forms at the beginning of the file right after including of main form header file.
// Include file with product form declaration #include "FormProduct.h" // Include file with confirmation form declaration #include "FormConfirm.h" -
Modify
ButtonAdd_OnClickmethod to the following.void CFormMain::ButtonAdd_OnClick(IControl *sender) { if (!Application->DialogBoxes) // If regular form mode should be used { if (FormProduct->Execute(PRODUCT{ L"", 0.0f, 0 }) == ModalResult::Ok) // If user clicked "OK" button on product form { PRODUCT p{ FormProduct->getProduct() }; // Add product to storage m_aProducts.push_back(p); // Add product to widget m_pCheckListBoxProducts->Add(p.Name + L" [" + ToString(p.Quantity) + L" for $" + ToFixed(p.Price, 2) + L" each]"); } } else // Otherwise use dialog box mode // Show product dialog box with empty product, indicating it is new product and any "tag" value as it is not used in adding a product ExecuteDialogBoxProduct(PRODUCT{ L"", 0.0f, 0 }, true, 0); } -
Modify
ButtonEdit_OnClickmethod to the following.void CFormMain::ButtonEdit_OnClick(IControl *sender) { // If there is active row in the widget with products if (m_pCheckListBoxProducts->getActiveIndex() >= 0) { if (!Application->DialogBoxes) // If regular form mode should be used { if (FormProduct->Execute(m_aProducts[m_pCheckListBoxProducts->getActiveIndex()]) == ModalResult::Ok) // If user clicked "OK" button on product form { PRODUCT p{ FormProduct->getProduct() }; // Update product in storage m_aProducts[m_pCheckListBoxProducts->getActiveIndex()] = p; // Update product in widget m_pCheckListBoxProducts->getItem(m_pCheckListBoxProducts->getActiveIndex())->setCaption(p.Name + L" [" + ToString(p.Quantity) + L" for $" + ToFixed(p.Price, 2) + L" each]"); } } else // Otherwise use dialog box mode // Show product dialog box with product information, indicating it is existing product and "tag" equals to the product index in widget and products storage ExecuteDialogBoxProduct(m_aProducts[m_pCheckListBoxProducts->getActiveIndex()], false, m_pCheckListBoxProducts->getActiveIndex()); } } -
Modify
ButtonDelete_OnClickmethod to the following.void CFormMain::ButtonDelete_OnClick(IControl *sender) { // Check if at least one product is selected bool has_checked{ false }; for (int i = 0; i < m_pCheckListBoxProducts->getItemCount(); i++) if (m_pCheckListBoxProducts->getItem(i)->isChecked()) { has_checked = true; break; } // Only if there is at least one selected product if (has_checked) { if (!Application->DialogBoxes) // If regular form mode should be used { if (FormConfirm->Execute(L"Are you sure you want to delete selected products?") == ModalResult::Ok) // If user click on "Yes" confirmation button { // Run through all products and delete them both from m_aProducts storage and widget for (int i = m_pCheckListBoxProducts->getItemCount() - 1; i >= 0; i--) if (m_pCheckListBoxProducts->isChecked(i)) { m_aProducts.erase(m_aProducts.begin() + i); m_pCheckListBoxProducts->Delete(i); } } } else // Otherwise use dialog box mode // Show delete selected products confirmation dialog box with action indicating deleting selected products ExecuteDialogBoxConfirm(L"Are you sure you want to delete selected products?", ACTION_DELETE); } } -
Modify
ButtonClear_OnClickmethod to the following.void CFormMain::ButtonClear_OnClick(IControl *sender) { // If there are products if (m_pCheckListBoxProducts->getItemCount() > 0) { if (!Application->DialogBoxes) // If regular form mode should be used { if (FormConfirm->Execute(L"Are you sure you want to delete information about all products?") == ModalResult::Ok) // If user click on "Yes" confirmation button { m_aProducts.clear(); m_pCheckListBoxProducts->Clear(); } } else // Otherwise use dialog box mode // Show delete all products confirmation dialog box with action indicating deleting all products ExecuteDialogBoxConfirm(L"Are you sure you want to delete information about all products?", ACTION_CLEAR); } }
As you can see we only added condition for checking which mode must be used and some code depending on the mode. It is not the best code of course it only demonstrates that form and dialog boxes, although they are very similar, can not be used sometimes in absolutely the same way and code should be a little different depending on mode. The main difference comes from the fact that in form mode ShowModal() method waits until form closes but in dialog box mode it does not so in dialog box mode listener should be used.
If you compile and run project you will see that now product and confirmation forms are real forms.
To switch to dialog box mode we need to change value of DialogBoxes property of application class. Lets do it. Change main.cpp file to following.
#include <Windows.h>

// Include file with platform application manager
#include "Platform/Core/Application.h"

// Include file with main form declaration
#include "FormMain.h"

// Include file with product form declaration
#include "FormProduct.h"

// Include file with confirmation form declaration
#include "FormConfirm.h"

// Tell the linker we want to link with the framework's core library. Mandatory
#pragma comment(lib, "Nitisa.lib")

// Tell the linker we want to link with the Standard package library as we use widgets from this package
// When we use widgets on the form from some package we should link our application with the library of that package
// Libraries for linking can also be specified in the project settings but we prefer doing this in this way as it is more informative
#pragma comment(lib, "Standard.lib")

// Tell the linker we want to link with platform-dependent code library. Required in most cases
#pragma comment(lib, "Platform.lib")

#pragma comment(lib, "opengl32.lib") // Add linking with OpenGL library
// We need to change DialogBoxes property so we must create an application class derived from standard one
class CMyApplication :public nitisa::CApplication
{
public:
    CMyApplication() :
		nitisa::CApplication()
	{
		// We set property value to true in constructor
		m_bDialogBoxes = true;
	}
};

int WINAPI WinMain(HINSTANCE, HINSTANCE, PSTR, INT)
{
    CMyApplication app; // Create application
    app.CreateForm(&nitisa::app::FormMain); // Create our form. Having variable for it makes it possible to use "CreateForm" but it can also be created as usual with "new" operator
    app.setMainForm(nitisa::app::FormMain); // Tell the application the form is the main form of the application
    if (!app.DialogBoxes) // If regular form mode should be used
    {
        app.CreateForm(&nitisa::app::FormProduct); // Create product adding/editing form
        app.CreateForm(&nitisa::app::FormConfirm); // Create product removing confirmation form
    }
    app.Run(); // Run application
    return 0;
}
All we have done here is added new class CMyApplication derived from standard CApplication to change value which DialogBoxes property has and declare/create app variable in the WinMain() function as CMyApplication app;. So now which mode is being used by the application depends on what the DialogBoxes of our application class CMyApplication contains. Now it is in dialog box mode but if we want it to be in regular form mode we only need to change true to false.
Conclusion
As you can see with help of Form Builder you can use forms in either mode you like and even in both. Both dialog box and regular form mode have some advantages and disadvantages but they are not major and selection of each mode depends completely of your preferences and required layout of your application. You can find complete source code of this turorial in the Windows → Tutorials → DialogBox folder of the Nitisa solution. The project is called ProductManager. As most of the tutorials inside the Nitisa solution it can be used in Debug configuration with x86 platform.