Tutorial: simple chat
In this tutorial we will show how to create simple chat application which is able to send messages from user computer to server and read messages of another users connected to the server. This tutorial will show you how to use such widgets(components and controls) like TCPClient, TCPServer, Timer, Memo, and others. It will also explain how to deal with multithreading.
This tutorial shows how to work with Nitisa downloaded as source code. If you with to follow it using Nitisa extension for Visual Studio, you may find useful information about creating project and forms in this tutorial. All other remains the same and you may follow steps of this tutorial skipping manual creation of form and project as you can do it using Nitisa extension templates instead.
About project
This project will be a system which allows any user, who have proper application, to connect to a text chatting system, send and read messages. To achieve this goal we will have two applications. The first one is server. It is responsible for storing all messages and managing user connections to it. The second application is a client which can connect to server, load messages from it, and send user's messages to the server. Lets start from the server application.
Server application
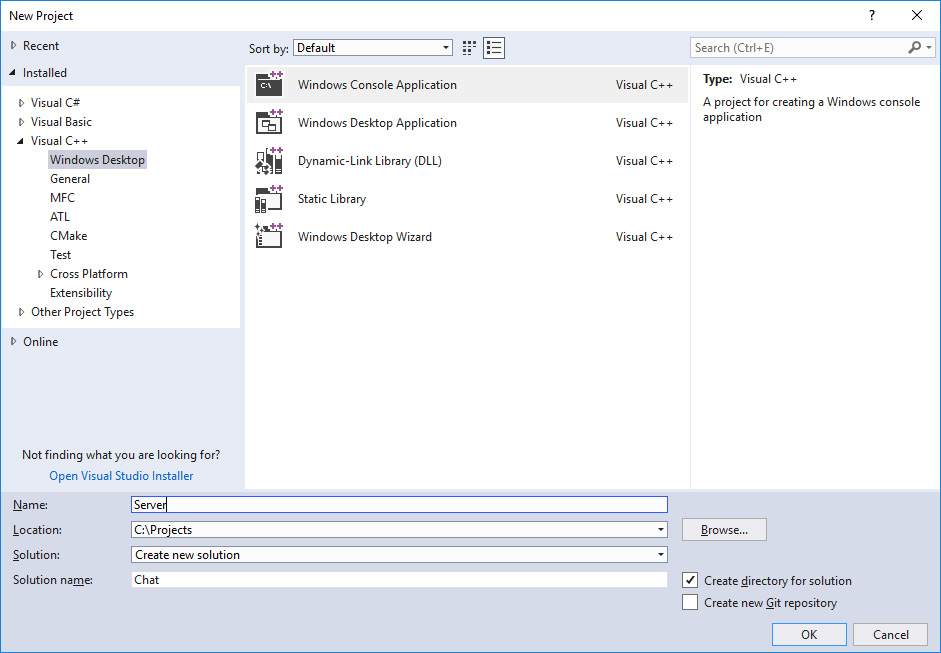
At first, create solution called Chat with project called Server like shown on image below.
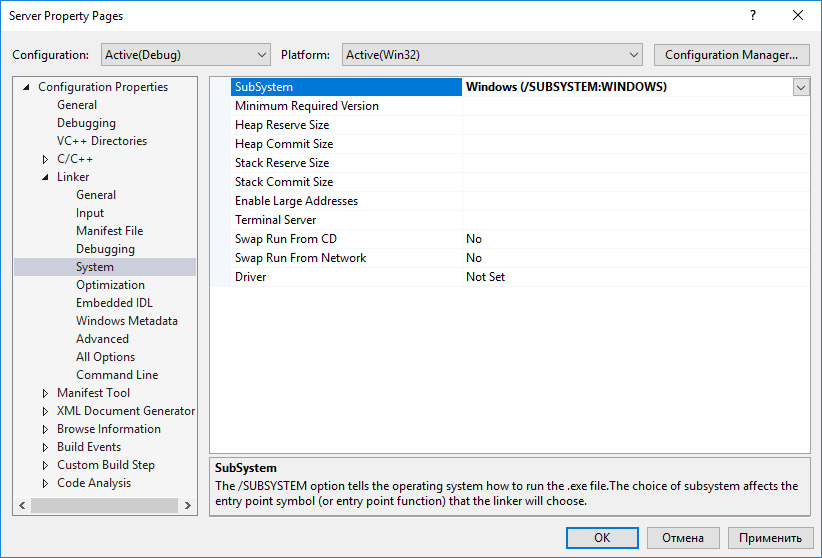
Next remove all automatically generated files from solution and add main.cpp file. After it, proceeding accordingly get started guide, disable using precompiled headers, setup paths to the Nitisa core and Standard package source code, add library path pointing to the Nitisa bin\Windows\x86\Debug directory, and set using Multi-threaded Debug runtime library. Please note that all this you should do for the x86 platform and Debug configuration. We will use this configuration-platform combination in our tutorial applications. Finally, set project SubSystem to Windows like shown below.
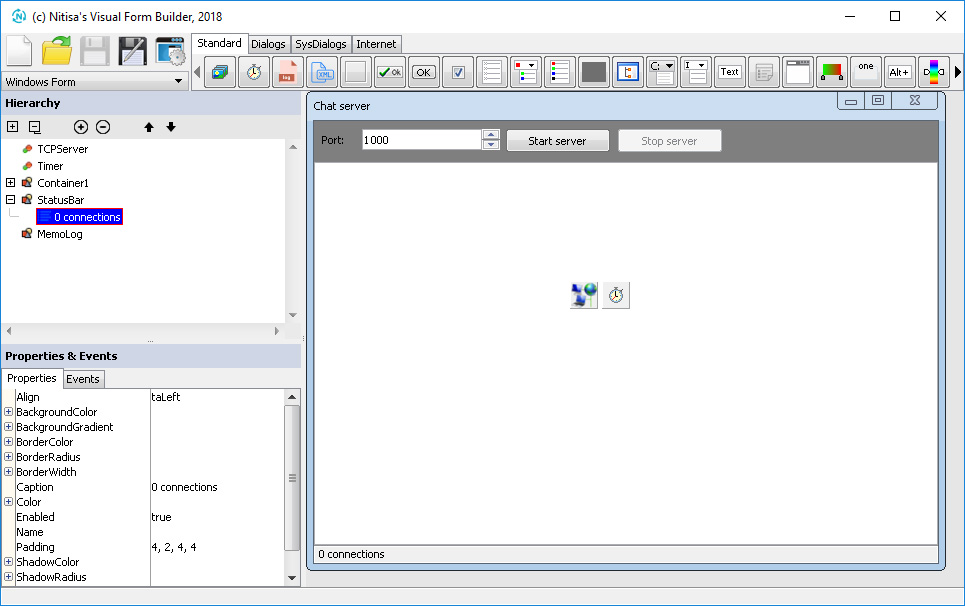
Now run the Form Builder and create a form for your server application similar to the one shown below.
To create this form just do following steps.
- Set form's Name property value to FormMain.
- Set form's Caption property value to Chat server.
- Add Container control from "Standard" tab to the form.
- Set container's Align property value to Top
- Add Label control onto the container.
- Set label's Caption property value to Port:.
- Add Edit control onto the container.
- Set edit control Name property value to EditPort.
- Add UpDown control onto the container.
- Assign UpDown to the edit control by changing it's property AssignedTo in Property Editor.
- Set Name property of the UpDown to UpDownPort.
- Set Max property of the UpDown to 65000.
- Set Min property of the UpDown to 1.
- Set Value property of the UpDown to 1000.
- Add Button control onto the container.
- Set Name property of the button to ButtonStart.
- Set Caption property of the button to Start server.
- Add another button to the container.
- Set Name property of the second button to ButtonStop.
- Set Caption property of the second button to Stop server.
- Disable second button by setting property called Enabled to false.
- Place all controls on the container as shown on the image above and adjust container height accordingly.
- Add StatusBar control to the form.
- Set Name property of the status bar to StatusBar.
- Add new panel to the status bar via Hierarchy Editor and set it's Caption property to 0 connections.
- Add Memo control to the form.
- Set memo's Name property to MemoLog.
- Set memo's Align property to Client.
- Set memo's ReadOnly property to true.
- Clear memo Text property value.
- Add TCPServer component from the Internet tab to the form.
- Set TCP server component Name property to TCPServer.
- Add Timer component to the form.
- Set timer component Name property to Timer.
- Set timer component Interval property to 2 seconds.
- Make timer active by default by setting its property Enabled to true.
- Generate OnClick event for both buttons by selecting button and double-clicking on OnClick event value.
- Generate OnClientHaveData event name for TCPServer in the same way.
- Generate OnTimer event name for timer.
- Save the form into the Server project directory in file called
FormMain.nfr.
We have added edit and up-down controls so that TCP server listening port could be selected. The two buttons will be used for start and stop server. On the status bar we will show how many clients are connected at the moment. And finally we will show some logs in the memo(like client requests) and timer we will use to update status bar showing how many users are connected.
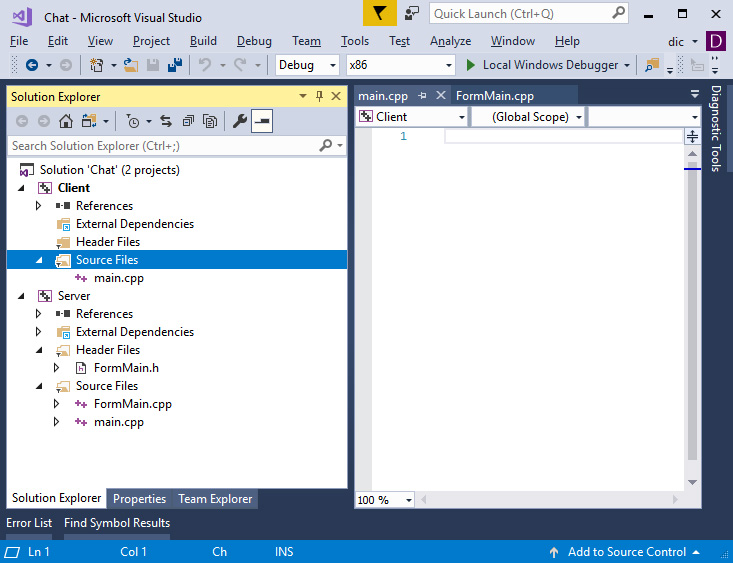
Now you have server's application form layout completely finished. Lets add some functionality to it as well. Create two files for application form source code. The files should be FormMain.h and FormMain.cpp. Into the first(header) file put following code.
#pragma once

#include "IFormMain.h" // Include form file generated by Form Builder

namespace nitisa
{
    namespace app
    {
        class CFormMain :public IFormMain // Class declaration for application's form
        {
        private:
            struct MESSAGE // Describe message from user
            {
                int Id; // Message identifier
                String User; // Name of user who send the message
                String Message; // Message text
            };

            std::vector<MESSAGE> m_aMessages; // List of all messages
            std::vector<String> m_aLogs; // List of messages to be added to memo showing the log
            std::mutex m_sSync; // Synchronization object
        protected:
            // Event processing methods copied from IFormMain and declared as overrided
            void ButtonStart_OnClick(IControl *sender) override;
            void ButtonStop_OnClick(IControl *sender) override;
            void Timer_OnTimer(IComponent *sender) override;
            void TCPServer_OnClientHaveData(standard::ITCPServer *sender, standard::ITCPServer::IClient *client, bool &disconnect) override;
        public:
            CFormMain(); // Constructor
        };
    }
}
In the our form class we only need to derive it from the form class generated by Form Builder during saving a form, declare constructor and event processing methods which can be just copied from IFormMain.h file(from protected section) and marked as overrided(with removing virtual keyword or cause). The other thing we have added is a description of the message from user, variable to store all messages, variable for temporary storing log messages, and synchronization object(mutex). We need synchronized access to the resources because all TCP server events occur in separate threads.
Into the FormMain.cpp file put implementation of the form methods.
#include "Nitisa/Interfaces/IClientSocket.h" // Include client socket interface definition
#include "Platform/Core/Renderer.h" // Renderer class is here
#include "Platform/Core/Window.h" // Window class is here
#include "FormMain.h" // Our form declaration is here

namespace nitisa // All the forms should be in "nitisa" namespace
{
    namespace app // Our project form namespace. Can be changed in the Form Builder settings
    {
        using namespace standard; // We will use entities from the namespace of Standard Package often, so lets add this line to avoid writing "standard::" everywhere

        // Form's constructor
        CFormMain::CFormMain() :
            IFormMain(CWindow::Create(), CRenderer::Create()) // We just call parent constructor and pass new window and renderer objects to it
        {

        }

        // This method will be called when we click on "ButtonStart" button. We only clear log and start TCP server here
        void CFormMain::ButtonStart_OnClick(IControl *sender)
        {
            m_pMemoLog->setText(L""); // Clear the log
            m_pTCPServer->setPort(m_pUpDownPort->getValue()); // Set selected port to TCPServer component
            if (m_pTCPServer->setActive(true)) // Try to activate TCP server
            {
                m_pMemoLog->AddLine(L"TCP server started at port " + ToString(m_pTCPServer->getPort())); // Add to log that server has successfully started
                m_pButtonStart->setEnabled(false); // Disable start button to prevent starting already started server
                m_pButtonStop->setEnabled(true); // Enable stop server button
            }
            else // If starting failed, write it to log
                m_pMemoLog->AddLine(L"Failed to start TCP server");
        }

        // This method will be called when we click on "ButtonStop" button. We only stop TCP server here
        void CFormMain::ButtonStop_OnClick(IControl *sender)
        {
            m_pTCPServer->setActive(false); // Deactivate TCP server
            m_pButtonStop->setEnabled(false); // Disable stop server button
            m_pButtonStart->setEnabled(true); // Enable start server button
            m_pMemoLog->AddLine(L"Server stopped"); // Write information about stopping into the log
        }

        // This method will be called periodically
        void CFormMain::Timer_OnTimer(IComponent *sender)
        {
            m_sSync.lock(); // We access resources which are also could be changed in another thread, so the synchronization is required
            for (auto log : m_aLogs) // Move logs from temporary storage to Memo control
                m_pMemoLog->AddLine(log);
            m_aLogs.clear();
            m_sSync.unlock(); // Finish synchronous access
            cast<IListItemStatusPanelLabel*>(m_pStatusBar->getItem(0))->setCaption(ToString(m_pTCPServer->getClientCount()) + L" connections"); // Update status bar to show actually connected count of users
        }

        // This method will be called each time the connected to our TCP server client has some data to read
        void CFormMain::TCPServer_OnClientHaveData(standard::ITCPServer *sender, standard::ITCPServer::IClient *client, bool &disconnect)
        {
            bool is_read_messages; // Our server supports 2 types of request: read messages and send message
            client->getSocket()->Read(is_read_messages); // Each request to the server should start from identification of message type
            if (is_read_messages) // If client has requested a list of messages
            {
                // Client should send last message id it have to the server know which messages to send back
                int last_id;
                client->getSocket()->Read(last_id);
                // Prepare list of messages not forgetting about synchronization when accessing resources because this method is called from thread different from main one
                std::vector<MESSAGE> messages;
                m_sSync.lock();
                for (auto msg : m_aMessages)
                    if (msg.Id > last_id)
                        messages.push_back(msg);
                m_aLogs.push_back(L"Client requested messages with ID greater than " + ToString(last_id) + L". " + ToString(messages.size()) + L" found"); // Add log message
                m_sSync.unlock();
                // Write response to buffer and then send back all at once
                client->getSocket()->OpenWriteBuffer();
                client->getSocket()->Write((int)messages.size());
                for (auto msg : messages)
                {
                    client->getSocket()->Write(msg.Id);
                    client->getSocket()->Write(msg.User);
                    client->getSocket()->Write(msg.Message);
                }
                client->getSocket()->CloseWriteBuffer(); // Here is the place where data will be send back to the client
            }
            else // If user sends a message
            {
                // Read user name and message
                String user, message;
                client->getSocket()->Read(user);
                client->getSocket()->Read(message);
                // Add message to the list and update log. As usually synchronize access to the resources
                m_sSync.lock();
                m_aMessages.push_back({ (int)m_aMessages.size() + 1, user, message });
                m_aLogs.push_back(L"New message from '" + user + L"'"); // Add log message
                m_sSync.unlock();
            }
        }
    }
}
Constructor is quiet simple and standard. It just calls parent class constructor passing him window and renderer. No additional job is required in our constructor.
Methods handling clicks on buttons are also implementing simple logic. Fist method just clear memo, start TCP server, and enable/disable buttons accordingly. In real applications you will certainly add much more error handling but in this tutorial we only focus on main functionality.
The next method Timer_OnTimer is called periodically and used to update status bar showing how many clients are currently connected to the server and moving log message from temporary storage to Memo control. It is very simple method. The only thing you have to notice is using mutex to prevent accessing some of the resources simultaneously from several places. In case of using TCP server you have always to remember that all its events are called outside of main thread. The resources which require to be protected from such unsafe access are controls and some form data. In our case it is Memo with our log and array of messages send by users. To protect Memo control from accessing simultaneously from different threads we first store log messages in m_aLogs variable and then, in timer event, which is called in main thread, we move the messages from this variable to Memo control. Because we access m_aLogs variable from threads created by TCP server as well as from main thread we need to enclose it in synchronization brackets which are implemented by mutex in our case. So, to be clear, in this method synchronization actually protects m_aLogs variable, not the Memo control(which could be accessed safely without any protection from this method because it is called in main thread).
And finally the biggest and most important method is the TCPServer_OnClientHaveData which handles interaction between server and clients. In our simple server we only deal with two types of data exchange between server and client. The first type is a client requests list of already existing messages on the server and the second one is client/user send a new message. To let the server know which type of interaction is required a client will send boolean value as the first byte of the client-server data. If it is true, then we deal with request of message list. If it is false, then we deal with situation when new message is coming. In case of requesting message list our server is also expects integer parameter indicating which messages should be returned. This parameter called last_id and means the server should return all messages having id greater then specified value. If this parameter, for example, is 10, then we should return all messages having Id > 10(note that we store message Id in MESSAGE structure). When sending message in response to this request we use buffered output. It is useful when sending a large quantity of data. In case of the second type of interaction, when user just sends a new message, we expect two parameters: user name and message itself. So we read two strings and add a message in the list using messages array length for generation unique Id.
Put following code into main.cpp file to finish application.
#include <Windows.h>
#include "Platform/Core/Application.h" // Application implementation is here
#include "FormMain.h" // Our form is here

#pragma comment(lib, "Nitisa.lib") // Add linking of Nitisa core library
#pragma comment(lib, "Standard.lib") // Add linking of Standard Package library(here are all the controls located)
#pragma comment(lib, "Platform.lib") // Add linking of platform-dependent code library

#pragma comment(lib, "opengl32.lib") // Add linking with OpenGL library

int CALLBACK WinMain(HINSTANCE, HINSTANCE, LPSTR, int) // Main function
{
    // Declare variables for our form and application
    nitisa::app::CFormMain *form;
    nitisa::CApplication app;

    // Create form, set it as a main one, and run the application
    app.CreateForm(&form);
    app.setMainForm(form);
    app.Run();

    return 0;
}
That's it. The server application is ready. You can build it and run. Then you can start and stop it by corresponding buttons. There may be error during starting if the port you specified in PortEdit is already taken by another application. In this case just try another one. Now lets create client application.
Client application
Add empty project to solution, remove all automatically generated files, add main.cpp file, and setup project in the same way you did before(paths, using precompiled header, runtime library, and SubSystem). Lets call this project simple Client.
As usually when developing application with Nitisa framework we start from designing the main form of the application in Form Builder. Lets create the form shown on image below.

To create such a form follow this instructions:
- Set form's Name property to FormMain.
- Set form's Caption property to Chat client.
- Add Container control to the form.
- Set container's Align property to Top.
- Add Label control onto the container.
- Set label control Caption property to Server:.
- Add Edit control onto the container.
- Set Name property of the edit control to EditServer.
- Set Text property of the edit control to localhost.
- Add Label control onto the container.
- Set label control Caption property to Port:.
- Add Edit control onto the container.
- Set Name property of the edit control to EditPort.
- Add UpDown control onto the container.
- Set Name property of the up-down control to UpDownPort.
- Set Min property of the up-down control to 1.
- Set Max property of the up-down control to 65000.
- Set AssignedTo property of the up-down control to EditPort.
- Set Value property of the up-down control to 1000.
- Add third Label control onto the container.
- Set its Caption property to Name:.
- Add one more Edit control onto the container.
- Set this edit control Name property to EditName.
- Set this edit control Text property to your name.
- Add Button control onto the container.
- Set Name property of the button to ButtonConnect.
- Set Caption property of the button to Connect.
- Add another Button control onto the container.
- Set Name property of the new button to ButtonDisconnect.
- Set Caption property of the new button to Disconnect.
- Set Enabled property of the new button to false.
- Arrange controls on container as shown on image above and adjust container height accordingly.
- Add GroupBox control to the form.
- Set Align property of the group box to Bottom.
- Set Caption property of the group box to Write a message.
- Set Padding property of the group box to { 4, 18, 4, 4 }(only top value increased by 4 from default value).
- Add Edit control onto the group box.
- Set Align property of the edit control to Client.
- Set Name property of the edit control to EditMessage.
- Clear Text property of the edit control.
- Set Placeholder property of the edit control to Type a message.
- Adjust height of the group box as on the image.
- Add new GroupBox control to the form.
- Set the new group box Align property to Client.
- Set the new group box Caption property to Chat.
- Add Memo control to the chat group box.
- Set Name property of the memo control to MemoChat.
- Set Align property of the memo control to Client.
- Set ReadOnly property of the memo control to true.
- Clear Text property of the memo control.
- Add Timer component to the form.
- Set Name property of the timer component to Timer.
- Set Interval property of the timer component to 2.
- Add TCPClient component from the Internet tab to the form.
- Set Name property of the TCP client component to TCPClient.
- Generate both buttons OnClick event names.
- Generate timer's OnTimer event name.
- Generate EditMessage control OnKeyUp event name.
- Save form into Client project directory with name
FormMain.nfr.
We just added 4 inputs: the one to specify to which server the application should connect(we set the default value to localhost because usually all testing happens on local machine), the second one allows to specify at which port to connect(set the same port your server is listening), the third one is used to input user name, and the last one is for typing a message and sending it to the server and thus to all connected users. As in case of server application, we added two buttons: one is for connecting to server and the other is for disconnecting. In the middle of the form we have added a memo control which will be used to show all messages. And finally we have added timer which will be used to load new messages from server periodically and TCP client to perform communication with server.
Lets now implement logic of our client application. Create two files for it: FormMain.h for form code declaration and FormMain.cpp for form logic implementation. Add following code into FormMain.h file.
#pragma once

#include "IFormMain.h" // Include form file generated by Form Builder

namespace nitisa
{
    namespace app
    {
        class CFormMain :public IFormMain // Class declaration for application's form
        {
        private:
            int m_iLastId; // Variable for storing last received message id
        protected:
            // Event processing methods copied from IFormMain and declared as overrided
            void ButtonConnect_OnClick(IControl *sender) override;
            void ButtonDisconnect_OnClick(IControl *sender) override;
            void Timer_OnTimer(IComponent *sender) override;
            void EditMessage_OnKeyUp(IControl *sender, const MessageKey &m, bool &processed) override;
        public:
            CFormMain(); // Constructor
        };
    }
}
As before this file contains our form class declaration. Structure is common: private data needed for application logic, protected event handlers declared in IFormMain.h generated by Form Builder we should implement, and constructor. All we need here is just a variable m_iLastId to store identifier of last loaded from the server message. We, of course, could omit it and load all messages every time but it is not efficient, so lets load only new messages.
Into the FormMain.cpp file put following implementation of the methods of our client application form.
#include "NTL/Core/Utils.h" // Include some mathematical utilities like Min()/Max() functions
#include "Nitisa/Interfaces/IClientSocket.h" // Include client socket interface definition
#include "Nitisa/Interfaces/IDialogs.h" // Include dialogs interface declaration
#include "Nitisa/Interfaces/INetwork.h" // Include network interfaces declaration
#include "Platform/Core/Renderer.h" // Renderer class is here
#include "Platform/Core/Window.h" // Window class is here
#include "FormMain.h" // Our form declaration is here

namespace nitisa // All the forms should be in "nitisa" namespace
{
    namespace app // Our project form namespace. Can be changed in the Form Builder settings
    {
        using namespace standard; // We will use entities from the namespace of Standard Package often, so lets add this line to avoid writing "standard::" everywhere

        // Form's constructor
        CFormMain::CFormMain() :
            IFormMain(CWindow::Create(), CRenderer::Create()), // We just call parent constructor and pass new window and renderer objects to it
            m_iLastId{ 0 } // No message loaded yet
        {

        }

        // Process click on connect button
        void CFormMain::ButtonConnect_OnClick(IControl *sender)
        {
            m_pTCPClient->setServer(m_pEditServer->getText()); // Set server to TCPClient component
            m_pTCPClient->setPort(m_pUpDownPort->getValue()); // Set port to TCPClient component
            if (!m_pTCPClient->setActive(true)) // If failed to activate TCPClient(connect to server), just show an error dialog message and exit
            {
                Application->Dialogs->Error(L"Unable to connect");
                return;
            }
            m_pButtonConnect->setEnabled(false); // Disable connect button
            m_pButtonDisconnect->setEnabled(true); // Enable disconnect button
            m_pTimer->setEnabled(true); // Run timer
        }

        // Process click on disconnect button
        void CFormMain::ButtonDisconnect_OnClick(IControl *sender)
        {
            m_pTimer->setEnabled(false); // Stop timer
            m_pTCPClient->setActive(false); // Disconnect from server
            m_pButtonDisconnect->setEnabled(false); // Disable disconnect button
            m_pButtonConnect->setEnabled(true); // Enable connect button
        }

        // Timer method called periodically
        void CFormMain::Timer_OnTimer(IComponent *sender)
        {
            // Load new messages from server
            m_pTCPClient->getSocket()->Write(true); // true means we request list of messages
            m_pTCPClient->getSocket()->Write(m_iLastId); // Send last message Id we've got
            int count;
            m_pTCPClient->getSocket()->Read(count); // Read how much new message server found for us
            for (int i = 0; i < count; i++) // Load all messages server sent
            {
                int id;
                String user, message;
                m_pTCPClient->getSocket()->Read(id); // Read message Id
                m_pTCPClient->getSocket()->Read(user); // Read user name
                m_pTCPClient->getSocket()->Read(message); // Read message
                m_pMemoChat->AddLine(user + L": " + message); // Add message to Memo with all messages
                m_iLastId = ntl::Max<int>(m_iLastId, id); // Update last Id
            }
        }

        // Process key up on Edit control having the message to be send
        void CFormMain::EditMessage_OnKeyUp(IControl *sender, const MessageKey &m, bool &processed)
        {
            if (m.Key == Key::Return && m_pTCPClient->isActive()) // Send only if the key is Enter and we connected to a server
            {
                String user{ Trim(m_pEditName->getText()) }, message{ Trim(m_pEditMessage->getText()) }; // Get clean(without spaces at the beginning and at the end) user name and message
                if (!user.empty() && !message.empty()) // Send only if both user name and message are specified
                {
                    m_pTCPClient->getSocket()->Write(false); // false means we send new message to server
                    m_pTCPClient->getSocket()->Write(user); // Send user name
                    m_pTCPClient->getSocket()->Write(message); // Send message
                    m_pEditMessage->setText(L""); // Clear message Edit control
                }
            }
        }
    }
}
Constructor just calls parent class constructor with window and renderer objects and initialize m_iLastId variable.
Methods processing clicks on connect and disconnect buttons are quiet simple as well and all they do is very clear from comments.
In timer event processing method we just load all new messages from server and put them into MemoChat control in form "User: message".
The last method EditMessage_OnKeyUp is called when user press and release enter key on keyboard when Edit for message input is focused. In this method we send message to server but do it only if user typed his name and message and they are valid(not empty).
As you might have noticed there is no synchronization code in client application. This is because all the code runs only in main thread so no resources could be accessed in parallel. You may find out whether widget(control or component) triggers events not in main thread in documentation of Standard Package.
As for main.cpp, it is absolutely the same you have in server application. Just copy everything from corresponding file of the server application and paste it in main.cpp of the client application.
Conclusion
In this tutorial you have learned how to design forms for your applications in Form Builder, how to use different controls and components, and how to deal with multithreading in TCPServer. As you can see with Nitisa development of applications with graphical user interface(GUI) is quiet simple. Most of the work could be done in visual form builder and you can focus only on the application logic. The projects structure is also very simple: you have main.cpp which is almost identical for all projects(the only common difference is how many forms are created in there) and you have header and source files for your forms.
As was mention before in this tutorial we did not pay much attention on error handling but if you work on real project you have to. Always provide all possible checks and assign error handlers to the error events if they exist.
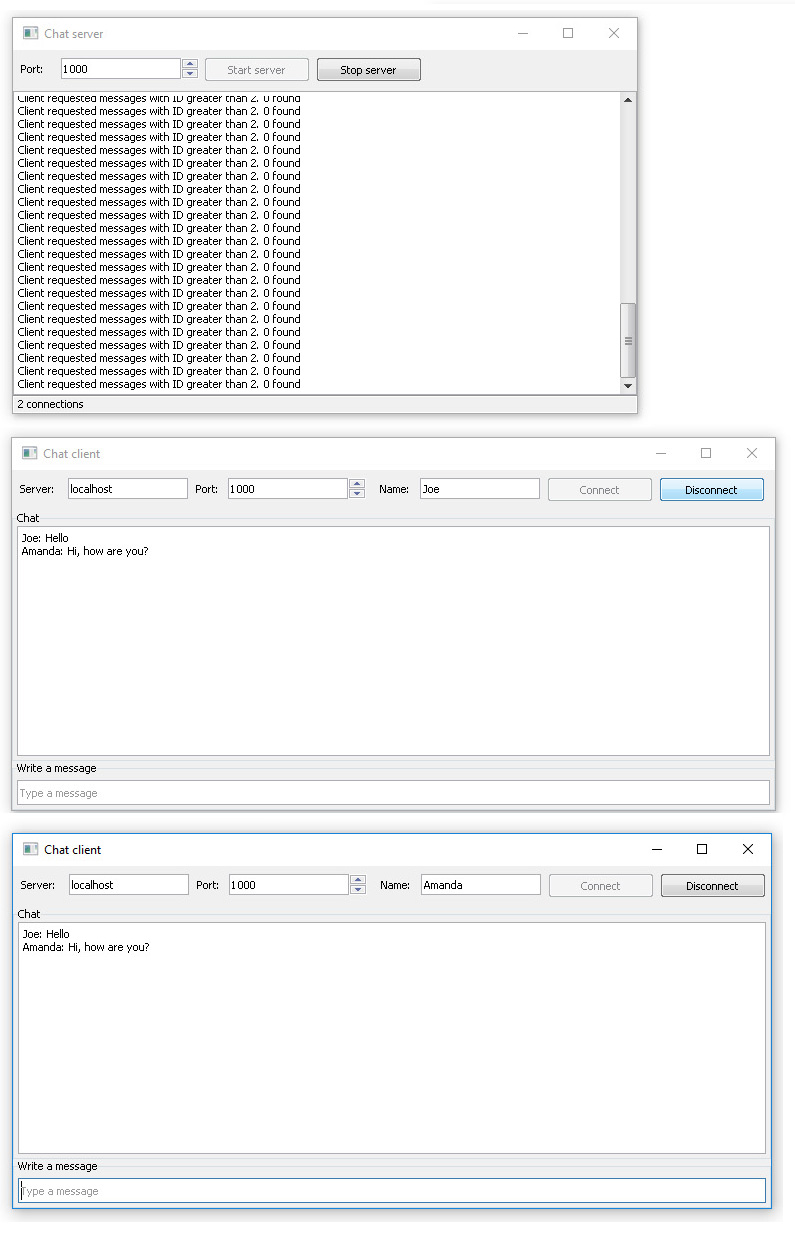
Here is a screenshot of running server and two client applications. You even can run server application on real server in the internet and send client applications to your friends and you will be able to communicate all together.
You can find projects Client and Server into the latest release of the Nitisa framework in Tutorials\Chat folder of the Nitisa solution. To build it you have to select Debug configuration and x86 platform.