Get Started
In this small tutorial we explain the usual application creating flow with Visual Studio 2017(you may use a different version but the entire process remains the same), the Nitisa framework and the Form Builder. It shouldn't take more than 30 minutes. After finishing this tutorial you will know how to use the framework and will be able to create amazing applications easily.
Setup project
First of all create a new Windows console project in Visual Studio. Why console? Well, of course your applications will be graphical, not console ones. We chose console type application for debugging purposes only. It have a console where you can easy output any debug information. Actually there won't be any debug output in this application and you can freely use the Windows Desktop Application type project. There is no any difference except for main function and moreover you can change the project type to console or to desktop when you want. For example, you may use console type in debug builds and desktop type in release builds.
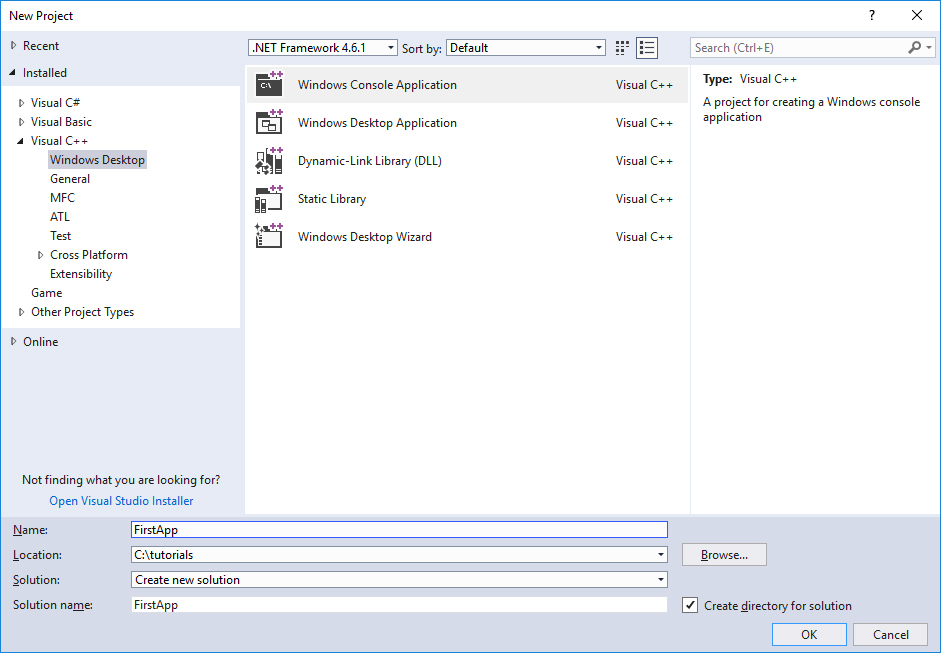
Once you've created a project, add a main.cpp file. You have to remove all files if the project isn't empty by default(don't forget to remove stdafx.h from project settings if it was in the project).
So now your project should only have one file called main.cpp and should have the following content.
#include <iostream>

void main()
{
    std::system("pause");
}
We have added one command in main function to pause execution before closing the application and it's console. It is useful to see debug output if it exists. Now we will add the framework directories to our solution.
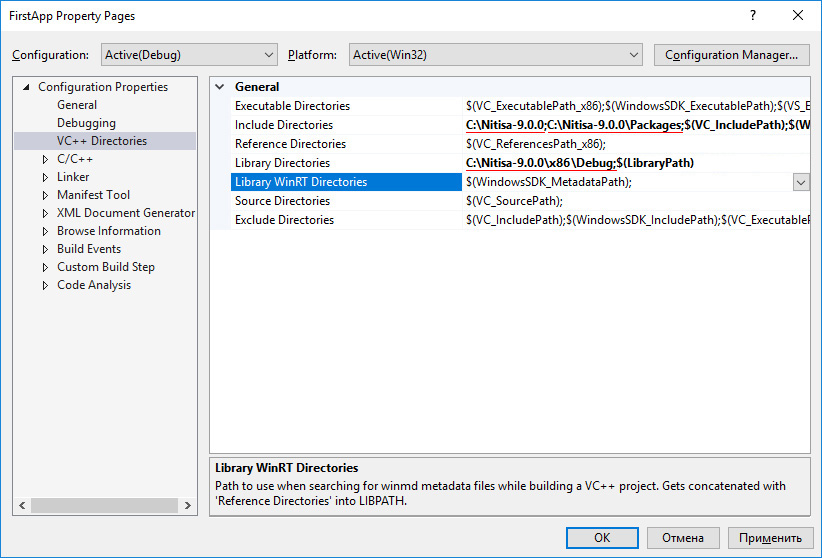
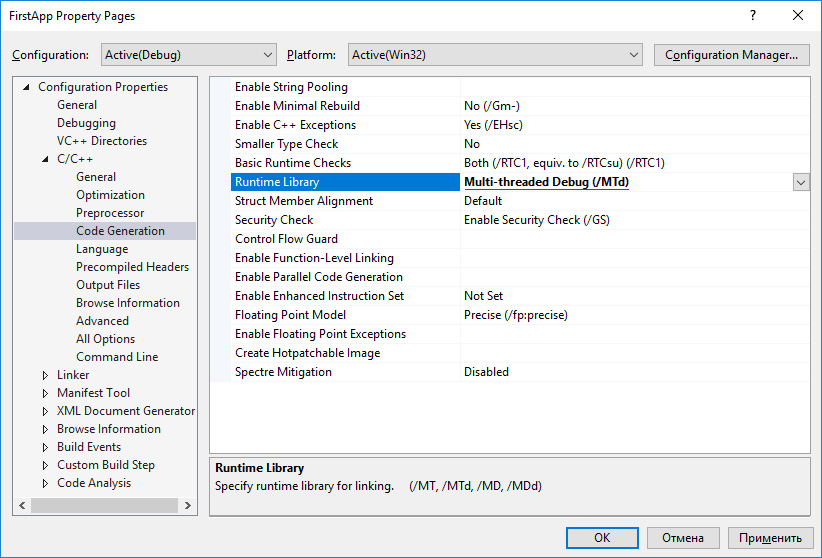
As you can see we have added two directories in Include Directories setting. The first one is to the folder where the framework files are. The second one is the folder Packages inside it. We have also added a path to the Library Directories. This path is pointed to directory where built static libraries of the framework are. If you haven't built it yet, do it now(just open the framework solution, choose Debug x86 mode and start building). This step isn't required and you may include the framework files in you own way, as well as add static libraries to it. But we assume in future explanations you do it in the way described here. When building the framework solution you have to check which Platform Toolset and Runtime Library you use. They should be the same for all the framework projects and your application.
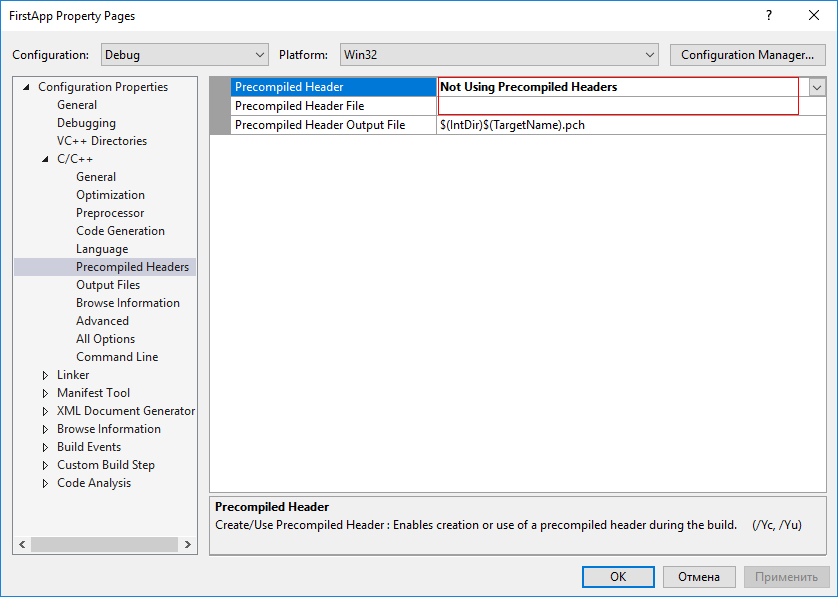
We also have to set Runtime Library linking to static as shown below.
Design a form
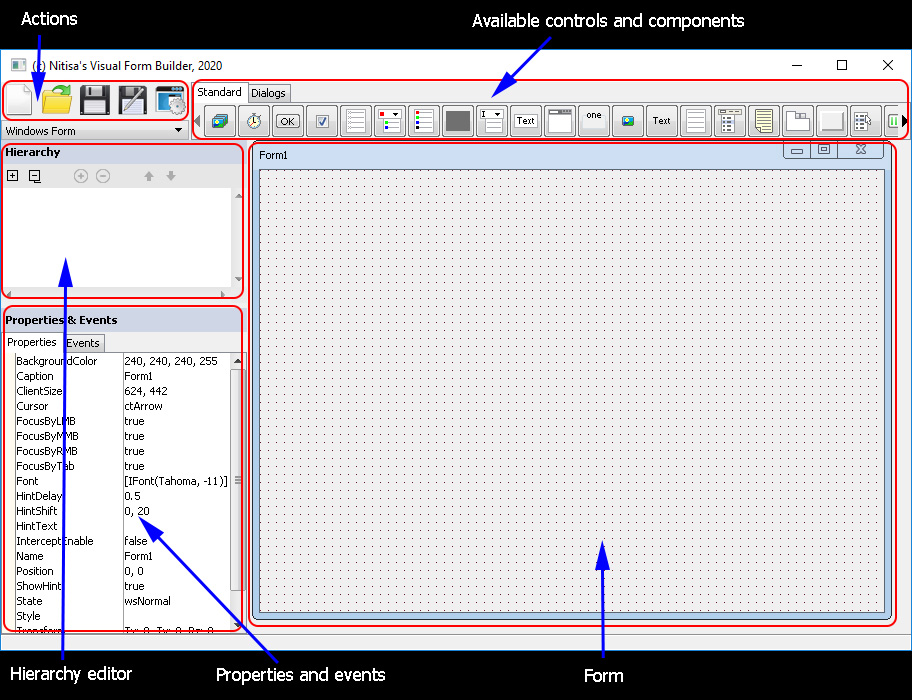
That is all preparation we need. Lets create a first form now. Please go to the framework installation directory. Find the x86\ReleaseRT subdirectory there(or x86\DebugRT, or x64\ReleaseRT, or x64\DebugRT; it depends which counfiguration and platform you choose when building solution). Find inside FormBuilder.exe application(if there is none in any of the folders it means you didn't build it yet; you have to open the framework solution, choose any *RT configuration(we recommend to use ReleaseRT and x86 platform) and build it) and run it. You will see a set of available controls and components(which are also called widgets) at the top, an empty hierarchy editor at left, a property editor with available form properties below it and an empty form in the center.
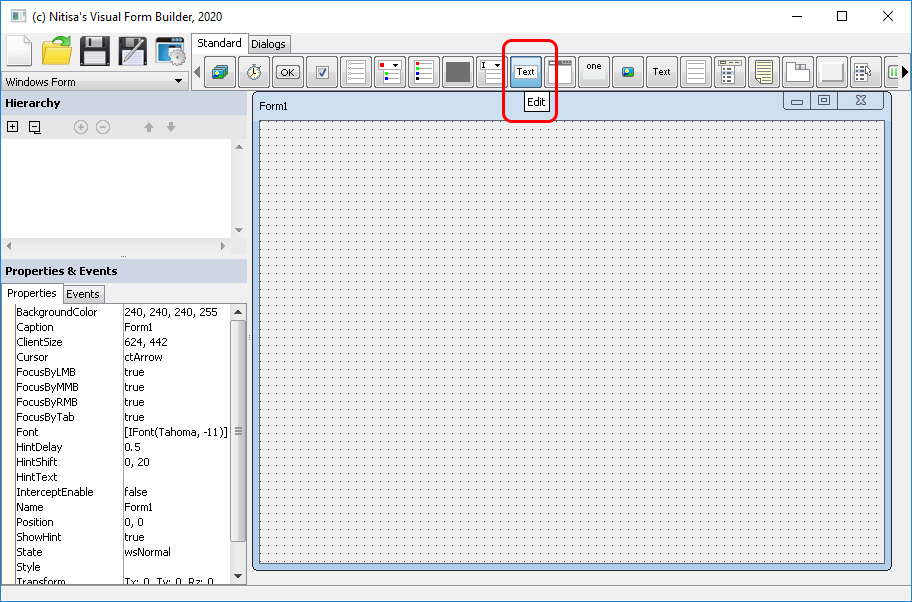
Click on the Edit control icon at the controls list at the top of the Form Builder window. Then click on the form in center. This is how an any control could be added to your form.
After you added a control it becomes selected. You can see some kind of bounding box around it with small squares which allow you to transform a control and change it position.
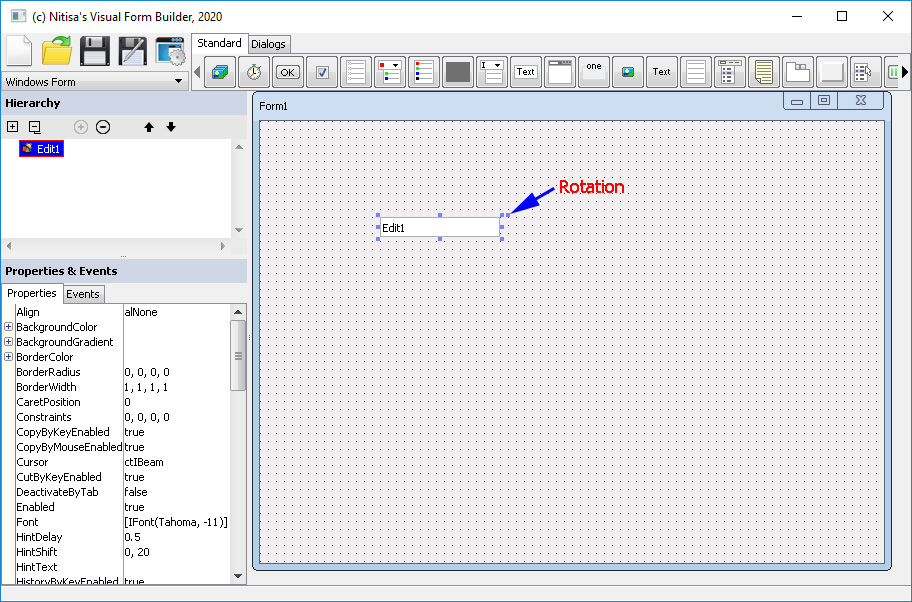
Lets create a form like following. You already know how to add controls. You may click on control and drag it to the position you want. To change a size of the selected control just drag one of the bounding squares except for the one which is a little bit shifted from others. This one is for rotation. You can change the form size as well by dragging it's right or bottom border or right-bottom corner. To delete control just press a Delete key on your keyboard(you should click on the control first to select it if it's not selected yet or if you have clicked on another parts of the Form Builder). When a control is selected you see it's properties at property editor. You may click on any property and edit it. The editing will be either inline or in a new window(depending on the property type). As you see controls positions and sizes are sticked to the grid shown by dots at form. By default grid size is 8x8 pixels for moving and size change and 10 degrees for rotation. To move control by 1 pixel instead use a keyboard arrows. To change size by 1 pixel use arrows and hold Shift key. Place on the form a control called Label and change it's Caption property to Name:. Change the Edit control property Text to empty. Add a Button control and change it's Caption to Say hello. Click on the empty space of the form. Now no control should be selected and you can edit form's properties in the property editor. Change Caption to First Form or anyone you like, change Name to FirstForm. Although the property editor allows you to set names to any string including spaces, different non-character symbols and even not latin characters, you should use only valid C++ names as they will be in your code.
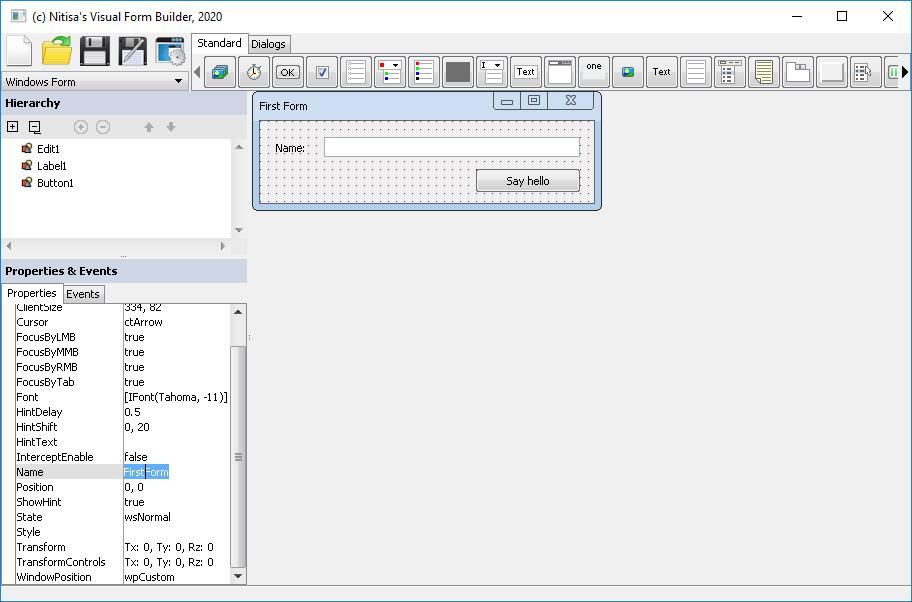
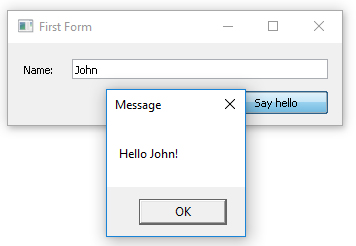
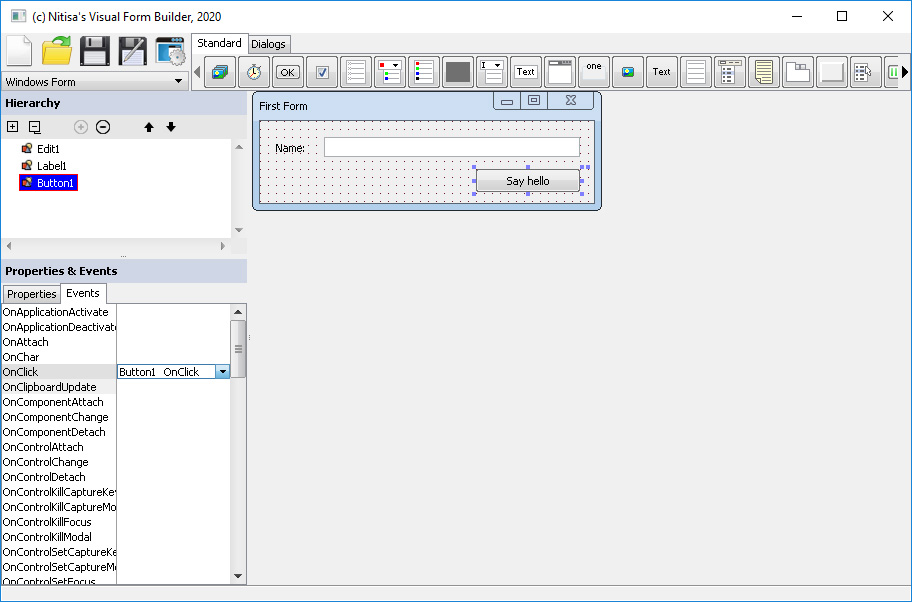
Our first application will take a name typed by user in Edit control and great him when he click on the button. That is why our form looks like on the picture above. Now we have finished form layout. Lets create an event for clicking on button. To do this, first of all click on the button on the form to select it, than go to Events tab of Properties & Events section of the Form Builder. You can see a lot of available events there. Find an event called OnClick and double click on empty area at the right of the event name. When you double click on empty event, the Event Editor creates an event for you based on control and event names. You may edit the value if you don't like the generated one.
We have finished with the form. Now save the form file in the same folder where you have your main.cpp file. To do it click on Save or Save as button at the left top part of the window of the Form Builder. It has a diskette picture on it. For the file name use FirstForm. When you save a form, the Form Builder actually creates two files. The first one with the name you specified and .nfr extension is the json representation of your form. You can later open such a file and continue working on it. The second file is called the same name you gave the form but with letter I at the beginning and has an extension .h. This file is a prototype of your form. You will use it to create your form in your application.
Add the form to the project
As mentioned before, now you have your form prototype in IFirstForm.h file(remember the rules of naming the file of form prototype and the name you gave to the form file while saving). The Form Builder creates a class for the form prototype with the name you gave to form in Form Builder and started with I. In our example it's IFirstForm. It is also placed inside namespace nitisa::app. You may configure internal namespace to whatever name you like in Form Builder configuration. By default the namespace is app. The first namespace is a global namespace of the framework. Everything is placed inside this namespace and namespaces inside it. Lets create a header file called FirstForm.h in our project and put following content in it.
#pragma once

#include "IFirstForm.h"
#include "Standard/Platform/Windows/Window.h"
#include "Standard/Platform/Windows/OpenGL/Renderer.h"

namespace nitisa
{
    namespace app
    {
        class CFirstForm : public IFirstForm
        {
        protected:
            void Button1_OnClick(IControl *sender) override
            {
                Application->getDialogs()->Message(L"Hello " + m_pEdit1->getText() + L"!");
            }
        public:
            CFirstForm() : IFirstForm(new standard::windows::CWindow(), new standard::windows::opengl::CRenderer(false, 0))
            {

            }
        };
    }
}
First of all we include a generated by the Form Builder our form prototype file. The last two includes add window and renderer. Each form require window to be drawn on and renderer to perform drawing operations. Then we create a class called CFirstForm derived from our prototype class IFirstForm. It has a method called Button1_OnClick which is called when a click event occurs at button. The prototype class(IFirstForm in the example) will have virtual declarations of all events so you won't forget to implement any of them because in the case you miss to add implementation of any event you will get a compile time error about impossibility to instantinate abstract class. In our simple example we just take a text from Edit control and show a simple modal message. As you can see the control name is m_pEdit1 while in Property Editor of the Form Builder it's name was Edit1. The prefix m_p is added by default. You may configure it in the Form Builder configuration window. The other note is about using unicode strings. The framework is unicode based, so every string properties, arguments and values should be in unicode(prefix L before string). At last we add the constructor to our form. Window is an object which is responsible for managing platform specific window. And the renderer is an object which is responsible for drawing operations. Currently there are several implementations of windows and renderers in Standard Package. We will use the ones for Windows platform which are placed in Standard/Platform/Windows folder. The renderer we use uses OpenGL and thus it's placed inside subdirectory called OpenGL. The names of two classes are CWindow and CRenderer. There is also GDI renderer which is placed in GDI folder and called CRenderer as well but placed into another namespace(nitisa::standard::windows::gdi one). So when creating a form we create window and renderer for it and pass it to parent IFirstForm constructor. That is all you require to create a form. Just design it in the Form Builder, create a class derived from form prototype generated by the Form Builder, implement events if there are, and add a constructor supplying it with a window and a renderer. You shouldn't use the only windows and renderers existing in Standard Package. You may create your own. How to implement your own window and renderer will be discussed in other articles. The one more note: an OpenGL renderer implementation constructor has two parameters. The first one indicates whether to use double buffering or not and the second one specifies anti aliasing factor. That is all, the form is ready.
Finish the application
Almost done. The only adjusting main.cpp is remained. Lets do it.
#include <iostream>

#include "Standard/Platform/Windows/Application.h"
#include "FirstForm.h"

#pragma comment(lib, "Nitisa.lib")
#pragma comment(lib, "Standard.lib")

using namespace nitisa;
using namespace nitisa::standard;
using namespace nitisa::standard::windows;
using namespace nitisa::app;

void main()
{
    CFirstForm *form;
    CApplication application;
    application.CreateForm(&form);
    application.setMainForm(form);
    application.Run();
    std::system("pause");
}
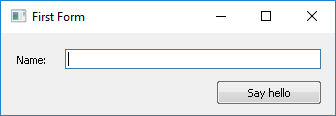
First, add an inclusion of the Application implementation from the Standard Package and our form implementation. Then add the libraries to the project - both core and Standard Package ones. You need to link with all static libraries you used in the project. If you have a lot of packages you have to add only those libraries which contains controls you use in your application. After it we have added usage of namespaces. It is not nesessary but it simplifies a code a little. This was a prepartion and now, finally, the main function implementation. First of all we need to declare a variable for our form. Then we must declare and create application instance. After it just call the application method CreateForm() supplying it with the form variable to application create our form. Then assign a main form of the application. Assigning main form results in following behaviour. All forms created after assigning a main one could be modal regarding to the main one. It means when you call ShowModal() method of the form, which was created after assigning the main form, the main form and other dependent forms will be disabled and only the form which ShowModal() you called will be accessible. The other important behaviour is when you close the main form, the other forms will be destroyed automatically and application will shutdown. The last step is to run by calling a Run() method of the application. That's all(the last line just prevent closing the console window after application finish it's work). Shortly, you have to declare a variable for your form(s), declare an application and create it, create your main form, set it as main, create other forms if exist, run the application. Now compile and run it. You will see a form like this.
If you type a name into Edit control and then click on Button, you will see a greating.