Databases
This article describes what is Nitisa's database systems, how it works and how to use it to connect to databases, retrieve data source/driver options and supported features, create and execute SQL statements and handle query results.
About
Initialization
Data sources and drivers
Connection
Connection properties
Statements
Result sets
Examples
ODBC with Nitisa interfaces
About
Nitisa database features provide an OOP way of working with ODBC. All commonly used database services have ODBC drivers for major operating systems. You may download them from corresponding official portals. Accordingly, an application which uses Nitisa database management features should be built with ODBC headers and libraries installed. Such headers and libraries are installed by default on Windows operating system together with development tools (Visual Studio). On linux platform they should be installed separately as described in Linux Development Requirements paragraph. Applications also require proper ODBC drivers to be installed on the system where they are run. You may include corresponding driver installation into the installation process of your application or include it into requirements for end user.
ODBC provides a universal way of working with different database services. It has a lot of very useful features but working with them directly may be hard. It requires writing hundreds of lines of code to achieve needed goal. That is where Nitisa comes to help. It provides all required preparation, error handling, data conversion under the hood and saves hours and days of time when writing of applications which use databases. As you will see in the following paragraphs using Nitisa OOP wrapper in most cases requires only focusing on proper query building and result interpretation while everything else is handled for your. On the other hand you still can use ODBC functions together with Nitisa interfaces.
Pay attention on which version of ODBC driver you install. The 32-bit and 64-bit versions are usually installed separately. Your 32-bit applications works with 32-bit versions of ODBC drivers and 64-bit applications work with 64-bit ODBC drivers.
Initialization
Database management features are available through a global variable Application. As you might already know that variable is an application manager and is an instance of IApplication interface. Application manager has property IApplication::Db which contains an instance of database manager and is described by IDb interface.
To be able to work with databases the database manager need to be initialized. Initialization status of the database manager can be checked via its property IDb::Status. By default, its value is DbStatus::Uninitialized. To initialize database manager you need to call its IDb::Initialize() method. The method has no arguments and returns boolean value indicating whether initialization was successful or not. When you no longer need to work with databases you need to call IDb::Release() method. Here is an example of how you can do it in your main() function.
int main()
{
    CApplication app;
    if (app.Db->Initialize())
    {
        // Work with database
        // ....
        app.Db->Release();
    }
    // ...
}
You can work with databases using Nitisa framework without creating GUI. This is very convenient as many applications working with databases are server applications and are run on Linux servers without graphical interface available. This also allows to debug such applications remotely via SSH connection directly from Visual Studio.
After successful initialization the IDb::Status property is changed to DbStatus::Initialized. If Nitisa libraries and your application were build when there were no ODBC libraries and headers available (this is always the case when building it for Android target), the initialization will fail and the status will be changed to DbStatus::Unsupported. If they were built with ODBC headers and libraries available and some error happened the status will be set to DbStatus::Error. In such a case it might be useful to know what went wrong. To get extended information about errors you need to assign an error listener to the database manager. That can be done using IDb::setErrorListener() method which has one argument of type IErrorListener. Error listener has only method NotifyOnError() which is called any time an error detected. The error notification method has several arguments: full function name where error has happened, line number where that function is in source code, error information structure containing error numerical code and error text message, and array of string key-value pairs. The last two arguments are usually used together. As it was said error information structure contains also error text message. It's in the ErrorInfo::Message property. Often such an error text message need to show some values which may be different in different conditions. For example, if some argument has an unsupported value it is useful to show message not only stating that something is wrong with an argument but also indicating what exactly is wrong. That is done by placing some placeholder values into error text message and later replacing it with actual value. So, the error text message with placeholders are in the ErrorInfo::Message and actual values which needed to be used instead of placeholders are in the last argument of NotifyOnError() method. This separation is quite useful if you want to translate error messages to different languages. You can find more information about internationalization in this article. Also, all error text messages you might need to add to your translation matrix are located in the Packages/Platform/Core/Errors.cpp file of the framework.
By default, the assigned to the database manager error listener will also be automatically assigned to all the connections the database manager creates. It is useful feature which allows assigning error listener only once and use it everywhere. If you don't need it (for example, you may want to use different error listeners for database manager and connections) you may disable it by calling IDb::setAssignErrorListener() method with false argument. Also, there is default error listener implementation which simply prints error information to standard output (terminal). This error listener is implemented in CErrorListenerCout class. Getting this all together you can modify previous example to a better one, similar to the following.
int main()
{
    CApplication app;
    CErrorListenerCout ErrorListener; // Here you may use your own error listener implementation class
    app.Db->setErrorListener(&ErrorListener);
    if (app.Db->Initialize())
    {
        // Work with database
        // ....
        app.Db->Release();
    }
    // ...
}
You may assign error listener (and nullptr - no error listener) as many times as you want. Also, you may change AssignErrorListener property in the same way. New error listener setting starts to work for all methods of database manager called after changes.
You may also set ODBC version you might what to use by IDb::setOdbcVersion() method before initialization. It has no effect after initialization. You may call IDb::Initialize() method as many times as you need. In case the database manager is already initialized it will only increase the internal reference counter and return true. You need to call IDb::Release() as many times as you called IDb::Initialize() in this case. The real release of the database manager will happen only after this. Sometimes you might want to know when the real release happens. For that you may subscribe to release event by using IDb::RegisterReleaseListener() method supplying it with release listener which IReleasableListener::NotifyOnRelease() method will be called right before real release of database manager.
Data sources and drivers
Often you know exactly which database service your application works with but there are some situations where you might allow end user to select service he wants to use. In this case it is helpful to be able to get a list of all available database services. This can be done after successful initialization using IDb::getDataSources() and IDb::getDrivers() methods. The first method return array of key-value pairs where the first value of a pair is a data source name and the second value is corresponding description. This method returns available data sources describing connection options to different database services (or files). Usually data sources are needed to be configured first by end user and this is not a very convenient way. More useful is to connect to a database service using installed driver name rather than a data source because once database service ODBC driver is installed its name is automatically added to a list and no other user actions are required. To get a list of installed drivers the second method must be used. It returns an array of key-value pairs where the first value of a pair is a driver name and the second one is its options. You can use driver name later to connect to database service.
You can also use IDb::getDataSourceCount(), IDb::getDataSource(), IDb::getDriverCount() and IDb::getDriver() methods to get data sources and drivers one by one. Data source and drivers are loaded only once when you call one of these six methods first time. If you for some reason (like adding data source without restarting application) want to reload a list, you may call IDb::getDataSources() and IDb::getDrivers() with true argument.
Following example shows how to get list of installed drivers. It just prints result in terminal window.
int main()
{
    CApplication app;
    if (app.Db->Initialize())
    {
        auto data{ app.Db->getDrivers() };
        for (auto kv : data)
            std::wcout << kv.first << L": " << kv.second << std::endl;
        app.Db->Release();
    }
    std::system("pause");

    return 0;
}
And here is an example of its output. Here you can see that the only Microsoft SQL and Oracle MySQL ODBC drivers are installed.

Connection
After successful initialization you need to connect to selected database service. There are two overloaded IDb::Connect() methods to do that. The first variant is to use connection string and the second one is more convenient because you can use server name, port, username, password and database as arguments, and they will be composed into proper connection string for you. prompt and window arguments can be used to build connection string on the fly. ODBC may show its own parameter selection dialogs to allow user to select or input options required to build proper connection string. This might happen with prompt equals to true. The window argument might be used to specify parent window for those dialogs. If connection is successful methods return IDbConnection interface instance representing the connection. In case of an error result will be nullptr. In this case you will get more information about an error via assigned error listener if there is one.
Below you can see an example code of connection to MySQL database service.
IDbConnection *connection{ Application->Db->Connect(L"MySQL ODBC 8.0 Unicode Driver", L"", 0, L"root", L"root") };
if (connection)
{
    // Work with database
    // ...
    connection->Release();
}
Each successful connection must be release with calling of IDbConnection::Release() method.
There are also two overloaded similar methods IDb::ConnectIf() with the same arguments. They are also being used to connect to database service but at first they check whether connection with the same connection options already exists. If such a connection is found, methods increase internal reference counter of that connection and return it instead of creating a new one. It may be useful in big application divided into independent modules which require connection to the same database service. In each module it is better to use ConnectIf() methods rather then Connect(). In this case only one connection to database service will exist and will be used in all places. Although you may create as many the same connections as you wish it is better not to. One connection is usually suffice any needs.
IDb also stores all created connections and you may use its getConnectionCount() and getConnection() methods to get access to them.
Connection properties
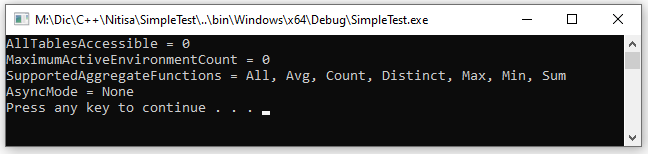
Having established connection to database service you can get detailed information about the service, its options and supported features. IDbConnection interface has a lot of getters to receive that information. All those methods are marked by // Return features availability and their options comment on the interface reference page. Many of the methods return scalar values (boolean or number) but many also return structures and enumerations. When structure is returned you may use direct conversion to a string and when enumeration is returned you may use ToString() function to convert it into a string representation. This might be very useful when debugging if you need that information printed somewhere. Here is an example.
std::wcout << L"AllTablesAccessible = " << connection->isAllTablesAccessible() << std::endl;
std::wcout << L"MaximumActiveEnvironmentCount = " << connection->getMaximumActiveEnvironmentCount() << std::endl;
std::wcout << L"SupportedAggregateFunctions = " << (String)connection->getSupportedAggregateFunctions() << std::endl;
std::wcout << L"AsyncMode = " << ToString(connection->getAsyncMode()) << std::endl;
As a result you can get something like this.
When such a method returns structure it has a Valid member indicating whether information was or wasn't successfully get. This can be used to identify whether a method succeeded or failed. In case of scalar or enumeration value returned this won't works. All these methods have optional argument bool *succeeded = nullptr. If you pass pointer to a boolean variable, that variable will be set to true if method succeeded of false if it failed. And, of course, you can use error listener in the same way we described earlier.
Statements
After connection to a database service its time to make queries. Queries may get information and data from tables, create and alter database structure, start and finish transactions, and so on. To execute a query a so called statement should be created. To create a statement the IDbConnection::CreateStatement() method is being used. It has no arguments. It returns either nullptr in case of error (use error listener to get details about an error) or instance of IDbStatement interface. The same statement can be used with different queries.
Statement can be used to execute prepared queries and to execute queries without preparation. Prepared query is a query being prepared once and executed later as many times as needed. Unprepared queries are being "prepared" each time they are executed. If you execute query only once, you may execute it directly. When you execute a query multiple times, it is better to prepare it first as in this case it will work faster. For prepared queries different statements are required because when you prepare another query on the same statement the previously prepared query will be lost. To prepare a query the IDbStatement::Prepare() method should be called with the query to be prepared as an argument.
Before executing a query you may need to configure statement. The main part of configuration is to decide which information should be retrieved for column headers during retrieving query result. If query doesn't get any data (for example, CREATE and INSERT queries don't get any data as a result), this part can be omitted. For SELECT queries usually there is some data and for such queries you might want to get more information about columns. For this purpose a set of setRetrieveColumn*() methods exist in the statement. You may pass true to receive that kind of column information or false to omit it. Also the method IDbStatement::setRetrieveColumnAllAttributes() can be used to turn on or off retrieving all the attributes. We recommend retrieving only those attributes you use. To check whether column attribute will be retrieved with next query execution, use RetrieveColumn* properties. All of them are false by default. The DbColumn structure representing column information has members named the same as those properties (without RetrieveColumn* part). Those members will be filled with proper values during query execution for each column in result set if corresponding RetrieveColumn* property is set to true. OctetLength, DataType and Unsigned structure members are always retrieved. The most commonly attribute needed to be additionally retrieved is a column name. You may turn it on by following code.
IDbStatement *statement{ connection->CreateStatement() };
if (statement)
{
    statement->setRetrieveColumnName(true);
    // Execute queries
    // ...
    statement->Release();
}
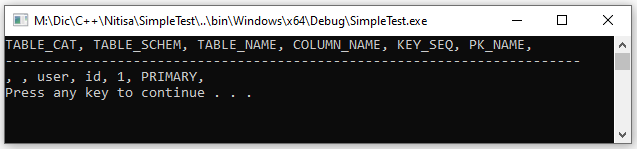
After statement is created and configured if necessary you may use its Query*() methods to get different information or Execute*() methods to execute your queries. The following example shows how to get primary key list form "user" table of "edi" database.
statement->setRetrieveColumnName(true); // Enable retrieving column names so we could print them later
DbResult result{ statement->QueryPrimaryKeys(L"edi", L"user", L"") }; // Get primary key list. DbResult will be explained later
if (result.Successful) // Check whether query was successful
{
    // Print colum names, comma separated
    for (auto const &column : result.Columns)
        std::wcout << column.Name << L", ";
    std::wcout << std::endl;
    std::wcout << L"------------------------------------------------------------------------" << std::endl;
    // Print result rows, comma separated
    for (auto const &row : result.Rows)
    {
        for (auto const &value : row)
            std::wcout << (String)value << L", ";
        std::wcout << std::endl;
    }
}
And here is an example of the code output.
There are several overloaded IDbStatement::Execute() methods to run queries. Overloaded variants with first argument const String &query are used to execute query directly. Overloaded variants without such an argument are to be used with prepared queries only. This means that for such queries the IDbStatement::Prepare() method of the statement should be called first. The other difference in overloaded methods is the input data. Methods can be called without any input data, with one row of data and with multiple rows. For one-row variants the const DbRow &row argument is used and for multi-row data variants the const DbRows &rows argument is used. Also those later two variants have optional argument const bool validate = false. This last argument if set to true forces validation of incoming data (row and rows). If you are sure the data you pass is valid, you may skip validation for performance optimization. Otherwise we strongly recommend to use validation or, in case of invalid data, your application will crash.
So, what is the row and rows are? The row argument is described by DbRow data type and is an array of values (std::vector). This array contains values to be used in a query. For example, if you use INSERT query to insert, lets say, username, password and registration date in table with users during user registration, the row argument will have three values: username, password and registration datetime. Each value in a row is described by DbValue structure. DbValue is a storage of the value which may be integer, float, string and some others and can be easily converted between those data types. The data types the DbValue can store are selected to the ones widely used with database queries. Because there are data types that can easily be treated by compiler in a wrong way (for example, DbValue str{ L"Hello world!" }; will most likely be treated not like a string but like an integer value) you should always prefix constant values with the data type needed to be in DbValue (so, the previous example should be rewritten as DbValue str{ (String)L"Hello world!" };, where (String) is added before constant value). The following example shows how a variable for inserting user data may look like.
DbRow user{
    DbValue{ (String)L"John Doe" },
    DbValue{ (String)L"Password" },
    DbValue{ (DbDateTime){ 2022, 01, 25, 11, 05, 33, 0 } }
};
The rows argument is just an array (std::vector) or rows we described in previous paragraph. For example, to insert two users the previous example can be rewritten like following.
DbRows users{
    DbRow{
        DbValue{ (String)L"admin" },
        DbValue{ (String)L"admin-password" },
        DbValue{ (DbDateTime){ 2000, 01, 01, 00, 00, 00, 0 } }
    },
    DbRow{
        DbValue{ (String)L"manager" },
        DbValue{ (String)L"manager-password" },
        DbValue{ (DbDateTime){ 2022, 01, 25, 11, 05, 33, 0 } }
    },
};
As the rows are processed one by one we strongly recommend to use them with prepared queries only. Especially if you have a lot of rows.
Queries are actually has only one rule: arguments should be specified as ?. That is all. So, the query to insert users in database will look like INSERT INTO user VALUES(?, ?, ?). Here three ? will be replaced with username, password and datetime from row/rows arguments of Execute() method.
Each Execute() method returns a result set which we will describe now.
Result sets
All Execute() and Query*() methods of IDbStatement return result in form of DbResult structure. The boolean member bool Successful; of the structure indicates whether execution was successful (member equals true) or failed (member equals false). If you need detailed information about what went wrong, use error listener. Some queries, like INSERT and UPDATE change data in database. You can use int64 AffectedRowCount; member to find out how many rows have been affected by the query. Another queries, like SELECT, return some data. Members DbColumns Columns; and DbRows Rows; store that data. The data is represented as a table. The first member contains information about columns, like column name, data type, and so on. The second member is an array of rows.
All Query*() methods return data in form of a table. They don't change anything.
Examples
Here we will show and explain some examples of usage Nitisa database features. MySQL is used as database service.
In the following example we connect to MySQL database service and execute CREATE query to create "app_db" database. We check whether execution was successful or not and just print corresponding message. In case of any error happens standard CErrorListenerCout will print detailed information to terminal. In this example we use direct query execution because creation a database/table/view/index/... is a one time operation.
int main()
{
    CApplication app;
    CErrorListenerCout ErrorListener;
    app.Db->setErrorListener(&ErrorListener);
    if (app.Db->Initialize())
    {
        IDbConnection *connection{ app.Db->Connect(L"MySQL ODBC 8.0 Unicode Driver", L"", 0, L"root", L"root") };
        if (connection)
        {
            IDbStatement *statement{ connection->CreateStatement() };
            if (statement)
            {
                DbResult result{ statement->Execute(L"CREATE DATABASE app_db") };
                if (result.Successful)
                    std::wcout << L"Database created successfully" << std::endl;
                else
                    std::wcout << L"Cannot create database" << std::endl;
                statement->Release();
            }
            connection->Release();
        }
        app.Db->Release();
    }
    std::system("pause");
    return 0;
}
In the following example we first switch to the database we created in previous example and then create "users" table there. As before USE and CREATE queries are executed directly because that is usually one time operation. Sometimes, in a very large applications multiple databases are used and switching between them happens many times. In this case for each USE query prepared query might be used. Please note that in this example we don't store execution result anywhere. We check whether the execution was successful by accessing Successful member directly. If a query don't return any result you need to use later such a check is Okay. We also showed here how long queries can be nicely formatted using raw string literals. The example also shows that the same statement can be used for multiple query execution.
int main()
{
    CApplication app;
    CErrorListenerCout ErrorListener;
    app.Db->setErrorListener(&ErrorListener);
    if (app.Db->Initialize())
    {
        IDbConnection *connection{ app.Db->Connect(L"MySQL ODBC 8.0 Unicode Driver", L"", 0, L"root", L"root") };
        if (connection)
        {
            IDbStatement *statement{ connection->CreateStatement() };
            if (statement)
            {
                if (statement->Execute(L"USE app_db").Successful)
                {
                    String query{ LR"===(
                        CREATE TABLE users(
                            id INT NOT NULL PRIMARY KEY AUTO_INCREMENT,
                            username VARCHAR(64) NOT NULL,
                            password VARCHAR(64) NOT NULL,
                            registered_at DATETIME NOT NULL DEFAULT CURRENT_TIMESTAMP
                        )
                    )===" };
                    if (statement->Execute(query).Successful)
                        std::wcout << L"Table 'users' created successfully" << std::endl;
                    else
                        std::wcout << L"Unable to create 'users' table" << std::endl;
                }
                else
                    std::wcout << L"Unable to switch to 'app_db' database" << std::endl;
                statement->Release();
            }
            connection->Release();
        }
        app.Db->Release();
    }
    std::system("pause");
    return 0;
}
The next example shows how to use prepared query. In this example we insert 3 default users in the table we created in previous example. It might be thought that in this example the INSERT query is executed only once because there is only one call of Execute() on the prepared query. But we pass three users and thus the query actually executed three times.
int main()
{
    CApplication app;
    CErrorListenerCout ErrorListener;
    app.Db->setErrorListener(&ErrorListener);
    if (app.Db->Initialize())
    {
        IDbConnection *connection{ app.Db->Connect(L"MySQL ODBC 8.0 Unicode Driver", L"", 0, L"root", L"root") };
        if (connection)
        {
            if (statement->Execute(L"USE app_db").Successful)
            {
                if (statement->Prepare(L"INSERT INTO users(username, password) VALUES(?, ?)"))
                {
                    DbRows users{
                        DbRow{
                            DbValue{ (String)L"admin" },
                            DbValue{ (String)L"admin-password" }
                        },
                        DbRow{
                            DbValue{ (String)L"manager" },
                            DbValue{ (String)L"manager-password" }
                        },
                        DbRow{
                            DbValue{ (String)L"test-user" },
                            DbValue{ (String)L"test-user-password" }
                        }
                    };
                    DbResult result{ statement->Execute(users) };
                    if (result.Successful)
                        std::wcout << result.AffectedRowCount << L" users added" << std::endl;
                    else
                        std::wcout << L"Unable to add users" << std::endl;
                }
                else
                    std::wcout << L"Unable to prepare query" << std::endl;
            }
            else
                std::wcout << L"Unable to switch to 'app_db' database" << std::endl;
            statement->Release();
        }
        app.Db->Release();
    }
    std::system("pause");
    return 0;
}
Of course in real applications nobody stores passwords in open form. If you now go and check the table you will see following data in it (the values in registered_at column will be different of course).

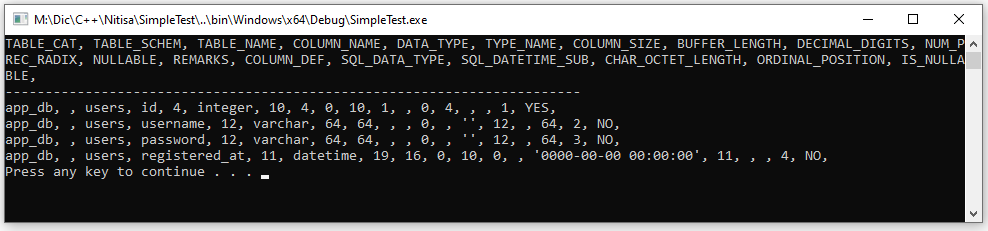
In the last example lets see how to get information about columns of "users" table we created earlier. For this we use one of the Query*() methods of the IDbStatement interface: QueryColumns. To be able to print column names we switched on retrieving it using setRetrieveColumnName() method before getting columns information.
int main()
{
    CApplication app;
    CErrorListenerCout ErrorListener;
    app.Db->setErrorListener(&ErrorListener);
    if (app.Db->Initialize())
    {
        IDbConnection *connection{ app.Db->Connect(L"MySQL ODBC 8.0 Unicode Driver", L"", 0, L"root", L"root") };
        if (connection)
        {
            statement->setRetrieveColumnName(true);
            DbResult result{ statement->QueryColumns(L"app_db", L"users", L"", L"") };
            if (result.Successful)
            {
                for (auto const &column : result.Columns)
                    std::wcout << column.Name << L", ";
                std::wcout << std::endl;
                std::wcout << L"------------------------------------------------------------------------" << std::endl;
                for (auto const &row : result.Rows)
                {
                    for (auto const &value : row)
                        std::wcout << (String)value << L", ";
                    std::wcout << std::endl;
                }
            }
            else
                std::wcout << L"Unable to get column information" << std::endl;
            statement->Release();
        }
        app.Db->Release();
    }
    std::system("pause");
    return 0;
}
The result this code prints is shown below. It's not pretty formatted (you can do it yourself) because of too many columns in the result set and too little space in the terminal window but it's readable.
As you can see it's quite easy to work with databases using Nitisa. If you try to rewrite those examples using ODBC directly they will be hundreds or event thousands lines long. Nitisa can save you a lot of time here.
ODBC with Nitisa interfaces
In some rare occasions you might want to work directly with ODBC functions and at the same time, to avoid a lot of work, you might want to use some of the Nitisa database management features. This may happen if you want to use some seldom used ODBC features which don't have OOP wrappers in Nitisa or when your data structure is very well suited to be used with ODBC directly via its bindings and it is critical for your application to save several percent of performance speed on converting data to DbRows form. Mixing Nitisa database management features with direct ODBC function calls is possible.
To work with ODBC functions you need environment, connection and statement handles. Nitisa interfaces give you access to them via Handle propery of IDb, IDbConnection and IDbStatement interfaces. Here is how you can get them.
SQLHENV h_env{ *reinterpret_cast<const SQLHENV*>(&app.Db->Handle) };
SQLHDBC h_dbc{ *reinterpret_cast<const SQLHDBC*>(&connection->Handle) };
SQLHSTMT h_stmt{ *reinterpret_cast<const SQLHSTMT*>(&statement->Handle) };
The most common scenario is to use Nitisa to initialize ODBC, connect to required database service, get its features, create statement and use direct ODBC function calls to work with that statement. You must be very careful when mixing direct ODBC functions with using of Nitisa interfaces. Make sure you return handle to its original state before using interface methods: clear all bindings, close cursors, etc. You can find more information about ODBC programming here.